Thursday, February 03, 2011

Stripping and welding

Since getting the bodytub back a few weeks ago, I've been working fairly hard to get it ready to go back over to the bodyshop for paint by the end of the month.
Paint stripping has been a bit laborious at times, making sure the old paint is out of every nook and cranny. This has mainly be done using Nitromoors to release the top layers, which can then be scraped off, just leaving the base coats, which were removed using a strip and clean disc on the angle grinder.

It was just as well that I decided to check every joint I could find on the body as it turned out that the majority of the welds along the bottom of the outer sills where not attached to anything else. This meant I could slip a scraper between the outer and inner sills, not good. I have now carefully seam welded the sills together.

Both sides of the windscreen frame needed repairs the the rear, the left hand side being easy, just needing a small patch at the bottom. However, the drivers side had rusted through the rain channel and the back of the pillar. Having removed the remains of the rain channel, I drilled and cut out part of the pillar as there was a lot of pitting by the angle.


Up front, the remains of cover strip over the roof lip was carefully cut at each end and peeled off. There was not much holding it on, so it came off without any further cutting. The surface below is a bit pitted in places and had gone through it a couple of places, but that was soon remedied with a bit of weld and ground back again. I'd already bought a replacement for this lip, which was over length, not a problem, but also the wrong 'U' profile, so I had to carefully cut a couple of milimeters off the entire length to allow it to sit back over the lip correctly. I'll ask the bodyshop to seal and spot-weld this in place when it goes back for paint.


One of the last jobs I did before sending it off to the bodyshop was repairs to the heelboards, both sides needed repairs around the outer mounting points. Rather than trying to make small patches, I decided to replace larger sections, which gave me a chance to check and paint the condition of the panel beneath.

The stripped body is now is now at the bodyshop, along with the bonnet, for preparation and paint, I hope to be able to collect it in the next month or so. Once back home I can start thinking about the re-fit, though it may be delayed a bit as I want to paint the inside and the weather is not really suitable for that at the moment.

Friday, January 07, 2011

Back home again

I'd hoped to collect the body before Christmas, but with the bit of snow we had, we decided it could wait until the new year. So earlier this week I trailered it back to the workshop. 


I'm aiming to get it back to the bodyshop in the second half of February, but before that there will be quite a bit of finishing to be done. The original plan was to try and get it seam sealed and painted internally before it went for paint, but considering the amount of other welding I need to do and how cold the weather is at the moment, it may have to wait until afterwards.
Think I'll resume by finishing off the radius arm brackets then work my way forward from the rear light panel, checking every joint and seam I can find. 

In the meantime I am looking for a chassis to borrow, as I could do with finding an easy and safe way to transport both the body and bonnet back to the bodyshop for paint.

Thursday, December 16, 2010

GT6 Bulkhead reconstruction part 2

With the recent cold weather we have been having I've not been so keen to work on the car recently, but I had agreed to move the body over to a bodyshop this week, so I wanted to get the bulkhead finished off if possible.
I don't have and in progress pictures this time, but once again  the floorpan has been remodelled and the new bulkhead section welded in place, though this time the piece was fabricated.


Back inside the car, one of the radius arm strengthening brackets has been moved across, this is because the body was swing spring and will be going to Jones/Bowler CV.

I've made a start on the other side, unfortunately this bracket has had plates welded over it, but I found a decent one on my other spare GT6 body.


The body is now over at the bodyshop to have the rear light panel, rear wing and outer arch fitted, which they reckon they may have done by the end of the week, then it's back to me to finish the bracket on the heel board, repair both toe boards where it bolts down through to the chassis, patch a couple of holes on the back of the screen frame, put a new lip on the leading edge of the roof and if there is time, seem seal and paint the inside, all ready from paint in February, at least that's the idea

Tuesday, November 30, 2010

GT6 rear wing preparation

After pulling out some dubious repairs from the rear wheel arch I worked out that the left hand rear wing had already had three repair panel welded on. The trouble with this is that the panels were not very good and had a thick layer of filler over them to cover it up, so I decided to get a new wing.
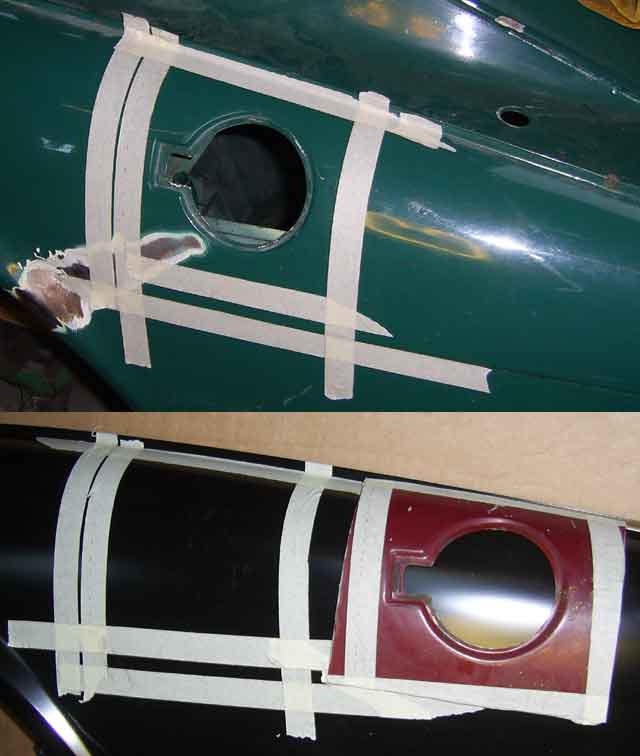
The complication here is that the fuel filler cap is in this wing and the company that produces this wing do not do the pressing for the fuel filler, but one of their suppliers could do the pressing, so I ordered an appropriate wing from them. Unfortunately it was not quite as I had hoped, the red one below is an original and the black a re-pro pressing.


I asked the company if they could do better and they said no, so the wing was exchanged at their cost for one without a filler hole and I set about moving a filler hole across. I started by marking up all the parts with masking tape to give me reference points of where the filler hole should be.


Then the filler panel was trimmed down and a hole cut in the new wing to allow me to drop the piece in before doing the final cut around, just in case I had it in the wrong place.


Once happy with this, the proper size hole was cut in the new wing before welding the hole in place. 


It's going to need a bit more finishing and possibly a skim of filler before paint, but I'm fairly happy with the result and glad that I should have something that looks right when fitted.  

Wednesday, November 24, 2010

GT6 Bulkhead reconstruction

A bit more fabricating and welding done this weekend. The vertical closer panel on the passenger side of the bulkhead was cut and folded.

The problem with this is that the new bottom corner of this panel reaches out over the floorpan. Having some spare floorpan parts, I decided to change the shape to make it all fit and look better.
Replacement section in place prior to cutting and welding.


Replacement piece welded in with the top hole filled in and the old corner of the floorpan cut out so not to create a redundant cavity.


And this is how it soon looked, with the bulkhead started to be welded in and some of the holes in the bulkhead being filled in. There is still quite a bit of grinding back to be done and pseudo spot welding between the bulkhead top and the vertical panels, then it's onto the drivers side, which will be more complicated again as the panels have to give room for the starter and clutch slave cylinder.


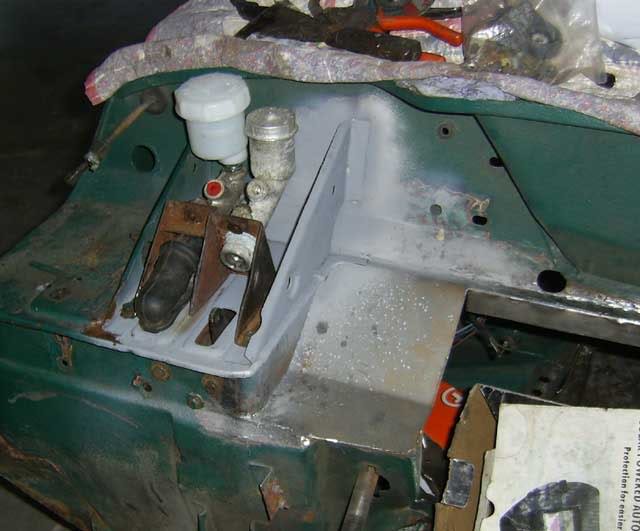
Later on, the top of the drivers side bulkhead finally buzzed in, which meant I could decide on the final position of the master cylinders, which have also been modified and welded together.

Thursday, November 11, 2010

GT6 Bulkhead mods

With a few other jobs out of the way I've started back on the replacement GT6 body with a bit more choppy chop around the bulkhead. 
As you can see from the pics below, I had already started on the drivers side before I remembered to take any pictures. The sides of the area around the pedal box have been boxed in and a new piece put in beside it to give more space for the air box.

As it was a few days ago


Remaining redundant top of bulkhead and front of tunnel cut off


New top of bulkhead positioned for the camera


While I am doing the welding around here I'll fill up the hole for the fuse box and all of the redundant holes also. At the same time I am thinking of re-positioning the wiper motor, as I have seen done before. This should make for a slightly less cluttered bulkhead and while I'm at it, I'll see if I can fit a more modern wiper motor, you know, one of those which actually go fast when you put it on the second speed, unlike some of the Triumph offerings.

Monday, October 25, 2010

Master cylinder mods

I've been able to make a bit more progress on the replacement body over the last few days, the replacement rear light panel is now fully trimmed back and I've made a start on trimming back the area it has to go into.
Meanwhile at the front I've been looking into the bulkhead mods again, with the benefit of hindsight and more time I'm going to try and make a neater job of it and try to make it look as factory spec as possible. This will mean putting the lip back on the top of the bulkhead shelf, keeping the factory size radii on the corners of the new parts of the bulkhead and replicating the detail of how the bulkhead finishes to join onto the tunnel. So far there has been a fair bit of head scratching and wandering between car bodies to work out how best to do it, but hopefully it should be worth it.

The area I looked at next was been the master cylinders, last time I just put the two master cylinder brackets next to each other and cut a new hole in the bulkhead, but that looks somewhat scruffy. This time I plan to do something like Dave has with his K series and fabricate a new bracket for the master cylinders, with a repositioned reservoir for the brake, then cut out and re-weld the pressing for the hole in the bulkhead.
I'm hoping I can find an appropriately size brake fluid reservoir to be able to keep it somewhere on the bulkhead and at the same time put the support/brace/bracket next to the master cylinders on the bulkhead.


A few days later I received a new master cylinder reservoir, the good thing about this one is that the outlet of the reservoir is offset, so it gives me enough space to open both master cylinder caps.


The problem I had is that it still sat a bit too high. The height can be reduced a bit by cutting down the thread, but that's not going to be enough. As I will have to fabricate a new bracket for the master cylinders I will change the angle of the bake master cylinder, making them more horizontal and giving me more space.
So this is what it looks like now with a mocked-up brake master cylinder, the reservoir should go down a bit lower again.