Work on the GT6 has been progressing slowly, with the gearbox tunnel starting to be fitted, to complete it though I will need the cut-down gear extension, so I know where to cut the hole for it.
I have had to do some maintenance on the Spitfire, I felt that it was becoming a bit gutless, so a new condenser and points were ordered. When I came to fit these parts I had great difficulty in driving the Spitfire from its normal parking space up into the barn, where I had all my tools and better lighting. Once up in the barn the points and condenser were replaced and... no change. The car still refused to go above 2000rpm.
Removing the air box revealed that the pistons and needles in the carburetters were not rising as the throttle was opened up. When the dash-pot from the carburetter was removed, the piston came with it - not a good sign. It turned out that over the years films of muck had built up inside and was preventing the piston to move freely. A quick clean the some silver polish and it was all moving well again.
For Christmas I drove in the Spitfire from Wales to East Anglia to meet up with my parents. About five miles into the journey and the car starts missing and the stops completely, on a blind corner just before the summit of a hill. After trying to start it again but to no avail, I jumped out and popped open the bonnet and whipped off the distributor cap, nothing obvious there but connections were checked and I was soon on the go again - at least I could get off the road now.
I drove to the next layby to have a better look, it turned out that a connection on the points from the wire from the coil was intermittent as the wire end had been crimped poorly and the crimp had failed.
I was on the go again though, later while passing through I was able to pick up another condenser and points, this time Lucas made.
Thursday, December 28, 2006
Friday, December 08, 2006
More space required, gearbox started & 10CR
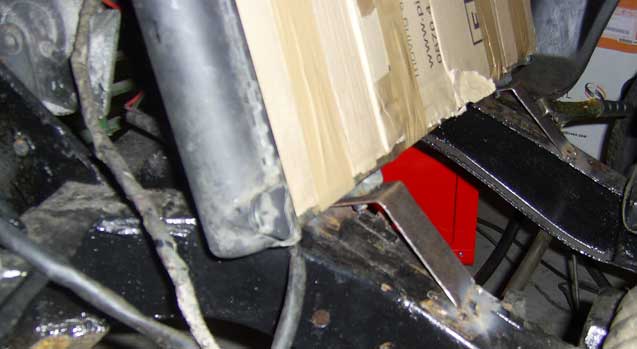
After spending some time the previous weekend making space for the metering unit and throttle bodies, I found that I needed even more space, this time I needed to push backwards into the car. Some rough cuts were made with the engine still in place but, to finish the job and make it look a bit tidier, the engine was removed again.

As can be seen in the image, I had boxed in an area for the metering unit; this has now had one side opened out to allow for the extra space required. It's all looking quite rough and ready at the moment, a bit more welding and paint should see it good though.
I seem to have had some sort of cold hanging around me for the past three weeks or so, which makes me quite lethargic. I could really do without it when I ought to be outside of an evening working on the car. Despite this I managed to drag myself out last night and started looking at gearboxes with a view to making a stronger box to go in the GT6.
The new gearbox will use the casing of the three rail boxes along with the internals of the later (and stronger) single rail gearboxes along with a "J" type overdrive. To complicate things, the later single rail overdrive gearboxes are longer than the early three rail ones, in a more standard car this would not be much of an issue, you would just have to have the prop shaft shortened and move the mount backwards.
Because I have moved the engine back six inches in my car, to move the gearbox mount further back would require an excessive amount of re-engineering. The alternative way to work around this is to use the earlier three rail "J" type main shaft (output shaft) and have a sleeve fitted over one end to bring it up to size and mate with the late input shaft. One of the Triumph parts suppliers stock a heavy-duty version of the early main shaft, hopefully this could be a direct replacement for a sleeved shaft, shall have to make a few more enquiries.
I started off with the single rail overdrive box, this came from a Triumph Dolomite 1850 which was being broken for spares, having been couriered over to me, I assumed the oil had been drained, but it had not, so that was the first job. It was quite encouraging as the oil flowed out that there was only a minimal amount of metallic material carried in the oil of on the magnetic sump plug, although I did find a locking screw, not sure where that has come from, but all other signs look good for it though.
It appears this box has been re-built sometime as all the joining surfaces have been smothered in a mastic type jointing compound and the serial number prefix of the box was CG, meaning the case originally came from a TR7, this was stamped over when it was re-built.
The gearbox, which is going to donate its case, is a non-overdrive three-rail version. This box was originally fitted in my GT6 when I purchased it and to the best of my knowledge it is the one that was supplied with the car. When I drained the oil from this box it was a completely different story as the oil was laden with bronze from the synchromesh rings and a mass of steel shavings clinging onto the magnetic sump plug.
Jobs for the forthcoming week include finishing of the bodywork around the bulkhead and stripping and assessing the quality of the component gearbox parts.
Almost forgot to mention, my entrance into the 10CR has been accepted. To learn more about the 10CR have a look here

As can be seen in the image, I had boxed in an area for the metering unit; this has now had one side opened out to allow for the extra space required. It's all looking quite rough and ready at the moment, a bit more welding and paint should see it good though.
I seem to have had some sort of cold hanging around me for the past three weeks or so, which makes me quite lethargic. I could really do without it when I ought to be outside of an evening working on the car. Despite this I managed to drag myself out last night and started looking at gearboxes with a view to making a stronger box to go in the GT6.
The new gearbox will use the casing of the three rail boxes along with the internals of the later (and stronger) single rail gearboxes along with a "J" type overdrive. To complicate things, the later single rail overdrive gearboxes are longer than the early three rail ones, in a more standard car this would not be much of an issue, you would just have to have the prop shaft shortened and move the mount backwards.
Because I have moved the engine back six inches in my car, to move the gearbox mount further back would require an excessive amount of re-engineering. The alternative way to work around this is to use the earlier three rail "J" type main shaft (output shaft) and have a sleeve fitted over one end to bring it up to size and mate with the late input shaft. One of the Triumph parts suppliers stock a heavy-duty version of the early main shaft, hopefully this could be a direct replacement for a sleeved shaft, shall have to make a few more enquiries.
I started off with the single rail overdrive box, this came from a Triumph Dolomite 1850 which was being broken for spares, having been couriered over to me, I assumed the oil had been drained, but it had not, so that was the first job. It was quite encouraging as the oil flowed out that there was only a minimal amount of metallic material carried in the oil of on the magnetic sump plug, although I did find a locking screw, not sure where that has come from, but all other signs look good for it though.

It appears this box has been re-built sometime as all the joining surfaces have been smothered in a mastic type jointing compound and the serial number prefix of the box was CG, meaning the case originally came from a TR7, this was stamped over when it was re-built.
The gearbox, which is going to donate its case, is a non-overdrive three-rail version. This box was originally fitted in my GT6 when I purchased it and to the best of my knowledge it is the one that was supplied with the car. When I drained the oil from this box it was a completely different story as the oil was laden with bronze from the synchromesh rings and a mass of steel shavings clinging onto the magnetic sump plug.
Jobs for the forthcoming week include finishing of the bodywork around the bulkhead and stripping and assessing the quality of the component gearbox parts.
Almost forgot to mention, my entrance into the 10CR has been accepted. To learn more about the 10CR have a look here
Sunday, November 26, 2006
Making a bit of room
Just as threatened, the Nuffield tractor was brought into action this weekend and the engine, complete with gearbox, was removed from the GT6. This was to enable me to make a couple more modifications to the bulkhead. There is now sufficient room beside the engine for the metering unit, its pipes and the distributor to all fit in.
On the other side of the bulkhead a little more space was made to fit the rear trottle body in. I was keen to get the engine out, make the modifications and the engine back in over the weekend, so as not to have the engine in the way, just in case somebody else needed to use the barn. Because of this, there is a bit of tidying-up to do around the bulkhead including painting, but hopefully I should be able to find time to do this during the week.

Although all the throttle bodies fit on the engine in the car, the linkages between them are still not clearing some of the bodywork. I have two options here, make more space in the bulkhead and risk getting too close to the steering column or have a major re-design of the linkages. I shall probably go for the latter, as there is so much slack in the linkages, I can see that in the end most if it would be replaced anyway.
Wednesday, November 22, 2006
Comings and goings.
Well it’s been a busy afternoon; I had a visit from Gareth Thomas, who has supplied me with a refurbished metering unit to fit the GT6 along with a set of injectors. My next job will be to get the injection system installed and working. You may be able to tell that I have decided to keep with the Lucas PI system (for now at least) as I have all the major parts required for it.
This weekend’s job will be to make space for the throttle bodies and the metering unit. First thing will be to move any wiring inside the car and then take a cut at the bulkhead to make space for the metering unit, before the engine is removed. With the engine removed I can start welding panels back in to cover the hole again.
Leaving with GT was the MkII cylinder head for some work to be carried out on it. I don’t expect to see that for a few months now though, better the time is taken and done properly.
Monday, November 20, 2006
More thoughts
I have spent a bit of time today pondering my situation with regard to fitting in the metering unit.
To fit the metering unit in another cut will need to be made into the bulkhead, close to the battery box. To make space for this, the starter solenoid, horn relay and hazard flasher unit will also have to be moved, the most sensible place for this would be in the car and whilst moving all the associated wiring the fuse box may as well come in also.
All of this cutting and moving of electrics could be avoided by not using the metering unit and by instead installing a EFI (electronic fuel injection) system that meters the fuel by measuring the position of the engine through a pick-up sensor on the crank, the throttle position and the air/fuel ratio to decide how much and when to let fuel through to the injectors.
The EFI system has its advantages with greater flexibility of settings, by use of a computer, but then there is a bloody-minded part of me that wants to see the Lucas PI system work before I dismiss it.
I trial fitted the complete throttle bodies on my spare cylinder head tonight, there is no end of lost movement in the throttle movement, I can see myself re-making the majority of the linkage with modern carb parts, hey well that’s another thing to keep me amused of a cold evening.
When I bought the GT6 it was my intention to improve it over a number of stages, so I could fully appreciate the work I had done, but so far I have moved the engine back 6 inches, changing the handling characteristics, converted to CV joints and changed the fuel induction system, but still I have not had a chance to drive the car, that’s really got to change before the year is out.
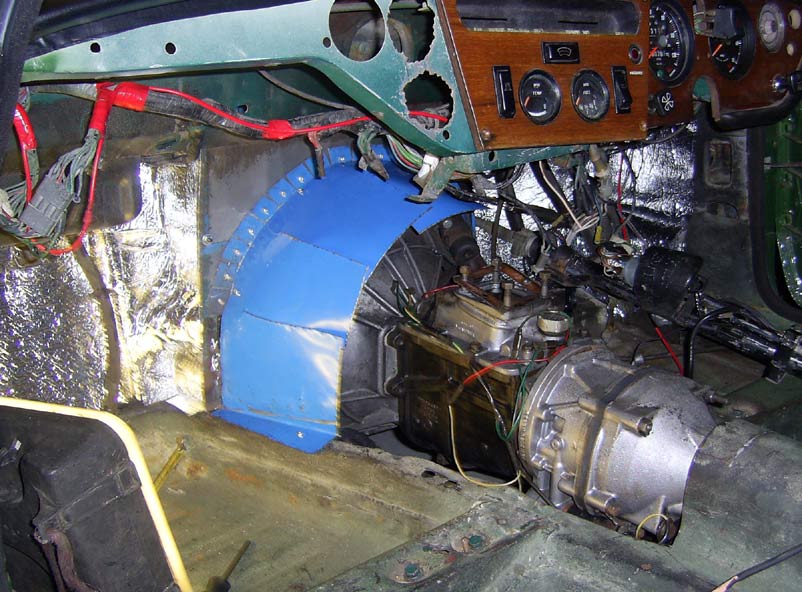
The image below should give you a rough idea of what I am up against, with the metering unit top left needing to sink down four inches next to the battery box.
To fit the metering unit in another cut will need to be made into the bulkhead, close to the battery box. To make space for this, the starter solenoid, horn relay and hazard flasher unit will also have to be moved, the most sensible place for this would be in the car and whilst moving all the associated wiring the fuse box may as well come in also.
All of this cutting and moving of electrics could be avoided by not using the metering unit and by instead installing a EFI (electronic fuel injection) system that meters the fuel by measuring the position of the engine through a pick-up sensor on the crank, the throttle position and the air/fuel ratio to decide how much and when to let fuel through to the injectors.
The EFI system has its advantages with greater flexibility of settings, by use of a computer, but then there is a bloody-minded part of me that wants to see the Lucas PI system work before I dismiss it.
I trial fitted the complete throttle bodies on my spare cylinder head tonight, there is no end of lost movement in the throttle movement, I can see myself re-making the majority of the linkage with modern carb parts, hey well that’s another thing to keep me amused of a cold evening.
When I bought the GT6 it was my intention to improve it over a number of stages, so I could fully appreciate the work I had done, but so far I have moved the engine back 6 inches, changing the handling characteristics, converted to CV joints and changed the fuel induction system, but still I have not had a chance to drive the car, that’s really got to change before the year is out.
The image below should give you a rough idea of what I am up against, with the metering unit top left needing to sink down four inches next to the battery box.

Sunday, November 19, 2006
PI thoughts
Had a trip up to the Black Country today to see a man about a full petrol injection (PI) kit for me to fit onto the GT6, whilst I was there I was taken for a ride in his 2.5 PI spitfire.
Great thrill even in the passenger seat, the only trouble is when your eyes start watering due to the flow of cold air. to see mopre about his car have a look here http://www.supersix.50megs.com/
With the PI kit back in overcast Wales, work started on removing the twin Stromberg carbs and inlet manifold, so a trial fit of the throttle bodies could be made. Not unsurprisingly more modifications to the bulkhead are going to be required to fit in the rear most pair of throttle bodies, oh well a bit more measuring up and it will be time to start the Nuffield and haul the engine out again.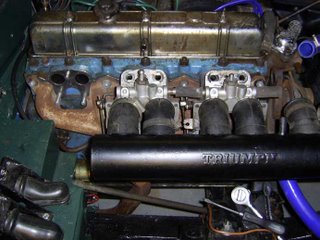
On the other side of the engine, a metering and fuel control unit have to be fitted, these drive off the camshaft at the same point as the distributor. Beacuse of the space required by the metering unit, bulkhead modifications are going to be required on this side also, probably along with the starter solenoid and fuse box being moved inside the car to give more space for the metering unit and its associated pipes.
Great thrill even in the passenger seat, the only trouble is when your eyes start watering due to the flow of cold air. to see mopre about his car have a look here http://www.supersix.50megs.com/
With the PI kit back in overcast Wales, work started on removing the twin Stromberg carbs and inlet manifold, so a trial fit of the throttle bodies could be made. Not unsurprisingly more modifications to the bulkhead are going to be required to fit in the rear most pair of throttle bodies, oh well a bit more measuring up and it will be time to start the Nuffield and haul the engine out again.

On the other side of the engine, a metering and fuel control unit have to be fitted, these drive off the camshaft at the same point as the distributor. Beacuse of the space required by the metering unit, bulkhead modifications are going to be required on this side also, probably along with the starter solenoid and fuse box being moved inside the car to give more space for the metering unit and its associated pipes.
Tuesday, November 14, 2006
Weight distribution & forward thinking
Well last week a I did a rough calculation as to the front-back weight distribution of the GT6 with the engine in its new positon. I have woked it out to be about 50-50, which should lead to a heck of a lot better handling then before with the engine in the original position. Plenty more to do yet, but its a good moral boost.
Thoughts have been lent to the next to the next stage of works to be carried out on the GT6 once I get it out on the road. My original intention was to fit tripple carbs, but to do this more of the bulkhead around the top of the drivers footwell hould have to be modified. This would include moving the wiper motor to the other side of the car and taking the clutch and brake master cylinders from the top of the bulkhead and insted use a pedal box with remote reservoirs.
The alternative, as pointed out to me on the Club Triumph forum, is to go for petrol injection (PI) A PI system was designed for the 2.5litre Triumphs and are avilable.
I believe that I should be able to fit a PI system onto the GT6 with the engine pushed back 6 inches, it having already been done before on Dave Picton's Spitfire, a car I could really do with getting a good look around.
The problem is that all of the Triumph PI systems were originally designed for use on 2.5 engines and I want to keep the 2 litre, it having a shorter stroke makes for a more lively engine. To do this the metering unit (the bit which decides how much petrol is fed out) needs to be adjusted to suit the 2 litre engine. This line of thought needs a bit more investigating, but it should make for a good setup, hope to learn a bit more in the next few weeks.
Tuesday, November 07, 2006
Busy weekend
Forgot to mention last time that on Saturday I picked-up the next engine for my GT6. The engine is a Mk2 Triumph Vitesse unit, same as the GT6 one but with a different serial number prefix. The engine had come out of a Bond and is still on its original pistons, so hopefully it should make for a good staring point of my fast road engine. For now it will go into storage untill the GT6 is a lot closer to being ready for the road.
A fair bit of time on Sunday was spent on fuel preparation for the house, eg cutting and fetching the fire wood. I started by going out to start the Roadless Fordson Major, unfortuntely it would not turn over so back I go to find another battery, again it does not turn over, but this time I went through all the major wiring connections and discovered a loose wire. So with the connection made good, off I went to pick-up the trailer and then down to one of the further fields to cut some wood and collect the blocks I had already cut a previous time. An hour later I had enough wood cut in the trailer and headed back to the wood shed to off load it ready to go in the house. The central heating in the house has not worked for some years now, instead heating and hot water is provided by a wood burner, hence the constant need for wood.
 Had another delivery today with my latest eBay purchase, a header tank for the cooling system, from cater7man. The smaller of the two fittings on the bottom is the feed from the expansion line from the radiator, the larger one is the return from the header tank back into the system, entering just before the water pump and the top feed on the tank is the air purge from the swirl pot. Next job will be to mock-up the system and work outwhat hoses will be required, time for more blue hoses from Merlin Motorsport http://www.merlinmotorsport.co.uk I guess.
Saturday, November 04, 2006
Its alive!
It's been eight months since I purchased the GT6, but at long last I have had the engine running. The engine that was in the car was never run under my ownership, I had tried to run it but had given up after a lot of fiddling, it turned out that the wiring loom had been hacked about by the previous owner.
Before I could get the engine started I had to finish installing the electric fuel pump, there was not enough space aound the bulkhead to fit the old mechanical fuel pump. In addition to this, I had to arrange some sort of cooling system.
I decided that the 205 radiator was going in and for this I made-up some small brackets, which have been welded onto the chassis and locate with the two lugs on the bottom of the radiator, as means to support it, I made up a couple of bracing struts, which go from the top of the radiator forward onto the chassis.
I do have a swirl pot to be fitted into the cooling system, unfortunately I will need a couple more hoses first, as the blue one I have at the moment will not bend enogh without kinking and restricting the system. At the moment the top hose is the original GT6 bottom hose, should do for now.
The engine bay is a bit of a mess at the moment as things like the fuel regulator needs to be mounted and the new header tank sourced and fitted. Really need to get the gear change remote cut down, then I might have some chance of driving it, at the moment the end of the handbrake sits underneath the gear stick.
Friday, November 03, 2006
What another weekend off the GT6?
I had (another) weekend away from the farm and working on the GT6. This time I went over to Cambridge to catch-up with some of my relatives and then off to The Cambridge Museum of Technology to give a hand running one of the engines and see how things were there. Before leaving East Anglia to go to university and then work in South Wales, I used to be a regular volunteer at the museum and was a board member for a period of time. Unfortunately the museum has not been in full steam for the past couple of years due to boiler problems and this weekend just gone was the first full steam weekend since completion of the boiler works.
On my journey back to Wales I had a couple of interesting problems, first of all the lights went out on me, this was at about 7pm properly dark then, fortunately I was able to pull on the full beam lights whilst feathering the brakes to give some rear lights and drive into a pub car park. In the car park I lifted the bonnet, it was bit reluctant release, I soon found out why, one of the bonnet poles which act as part of the hinge had failed, damn! Anyway, with the bonnet up I had a look at the fuses and turned them in their holders to see if I could see if the fuse wire had gone. The act of turning the lowest fuse caused the light to come back on, with 20-20 hindsight I know I should have investigated the problem further, but instead I went on down the road.Another twenty yards down the road and on the dual carriageway the lights went again, this time I knew it was a reasonable distance to the next pull in, so I had to go on the verge with hazard lights on. I repeated the process of turning the fuse to try and get some lights, for a while I could only get front lights, but after a bit more fiddling I had a full set. Half way through this second bit of fiddling the hazard lights failed, just what you don't want on a pitch-black dual carriageway. After fighting my way off the verge and back onto the road I headed to the nearest garage to sort it out properly. It seems there was not enough tension between the fuses and their contacts, so a box of matches were bought from the garage and wedged between the fuse contact and the holder to increase the tension. Well it appeared to have worked and got me back home with no further problems or at least until I noticed I had lost a wheel nut somewhere along the journey, which was promptly replaced the next day and the rest of the wheel nuts checked to torque.
I had planned to post this blog a few days ago, but since Tuesday afternoon I have had no broadband access. Seems BT has got some problems as I have not been able to connect from 52 hours now, just as well I managed to find a dial-up account though - seems so sloooow now.
 weekend since completion of the boiler works.
On my journey back to Wales I had a couple of interesting problems, first of all the lights went out on me, this was at about 7pm properly dark then, fortunately I was able to pull on the full beam lights whilst feathering the brakes to give some rear lights and drive into a pub car park. In the car park I lifted the bonnet, it was bit reluctant release, I soon found out why, one of the bonnet poles which act as part of the hinge had failed, damn! Anyway, with the bonnet up I had a look at the fuses and turned them in their holders to see if I could see if the fuse wire had gone. The act of turning the lowest fuse caused the light to come back on, with 20-20 hindsight I know I should have investigated the problem further, but instead I went on down the road.Another twenty yards down the road and on the dual carriageway the lights went again, this time I knew it was a reasonable distance to the next pull in, so I had to go on the verge with hazard lights on. I repeated the process of turning the fuse to try and get some lights, for a while I could only get front lights, but after a bit more fiddling I had a full set. Half way through this second bit of fiddling the hazard lights failed, just what you don't want on a pitch-black dual carriageway. After fighting my way off the verge and back onto the road I headed to the nearest garage to sort it out properly. It seems there was not enough tension between the fuses and their contacts, so a box of matches were bought from the garage and wedged between the fuse contact and the holder to increase the tension. Well it appeared to have worked and got me back home with no further problems or at least until I noticed I had lost a wheel nut somewhere along the journey, which was promptly replaced the next day and the rest of the wheel nuts checked to torque.
I had planned to post this blog a few days ago, but since Tuesday afternoon I have had no broadband access. Seems BT has got some problems as I have not been able to connect from 52 hours now, just as well I managed to find a dial-up account though - seems so sloooow now.
Tuesday, October 24, 2006
Radiator thoughts
With getting closer to running the engine in, thoughts have turned to the cooling system. OK I know the standard Triumph cooling system could be a lot better, but for now I will have to work with what I have without spending out too much money, well for now atleast.
A couple of months ago I picked-up a Peugeot 205 radiator from eBay, so I intend to fit that in place of the original GT6 rad.The 205 rad should offer a greater cooling surface area, at a fraction of the cost of re-coring the GT6 one. In addition to this, I sourced a brand new swirl pot, delivered for £25, a lot cheaper than those in Demon tweaks. The swirl pot will sit inbetween the top hose of the rad and the water pump, its purpose is to purge out and air that might be in the cooling system, preventing airlocks.
This is a tried and tested system with a lot of the design and brain work having been done by David Powell (davesideways), he of crazy spitfire blog I can see no point in re-inventing the wheel when someone has already done the work, perhaps I shall find some improvments as it develops?
Monday, October 23, 2006
Bit of sealing and tunnelling
Right, the fuel tank sealant arrived on Friday, so that evening I set to making use of it. The fuel tank was easy to remove, it has not been in all that long and has not seen any fuel from me yet, a couple of bolts and a pair of hoses removed and the tank was out. The tank needed to be clean before using the sealant, so after removing the level sender unit, a length of chain was fed into the tank and the whole tank shaken, with the chain inside, for a good ten minutes in order to remove any loose material from inside the tank.
Next step was to remove the chain and the loosened material from the tank, once clear the sealant could be added. The manufacturers recommend a pint of sealant for a nine gallon tank, as used in the GT6, however after coating the inside of the tank and letting the excess drain out, three quarters of it was left spare. Not wanting to waste the sealant, my spare fuel tank was quickly prepared and the sealant used in that swell. The spare tank had noticeable failures close to the outlet, where water from the road had risen up and caused corrosion on the outside, the sealant seems to have made a good job of blocking this up.
 The gearbox tunnel in coming on, it is being made in two sections, the front six inches of it will be fixed semi-permanently with pop-rivets, the rest of it being held down in the usual Triumph manner of large screws and spire clips. The front piece now has its basic shape and after a bit more welding and a couple of coats of paint, it should be ready for fitting. Before it is fitted, I must remember to fit the heater box, its all a bit cramped under there now and will not go in with the front piece of the gearbox tunnel in.
Friday, October 20, 2006
Got to get some enthusiasm
The GT6 project has hit a bit of a slow patch, I want to get the engine running soon, but before that I need to fit a fuel regulator as the Facet fuel pump I brought a couple of months ago has a output pressure of 4-6psi, way too high for the Stromberg carburettors fitted at the moment. I have been advised to fit a Filter King fuel pressure regulator, probably will get this from Merlin Motorsport.
The fuel tank in the GT6 has been welded at some point previously and so to save myself from the risks of leaks due to poor repairs; I plan to use POR15 fuel tank sealer. A one pint can of it should do the job, just have to remove the fuel sender, remove any loose material from within the tank and then seal up most or the apertures in the tank before emptying the contents of the fuel tank sealer into the tank and then work it around all of the internal surfaces. Once coated it will need to cure for about four days, should give me plenty of time to get the fuel regulator.
Meanwhile I have started making the custom gearbox tunnel, I tried fitting the standard tunnel, but it would need so much modification to make it fit that it would not have been worthwhile. This is also on hold now until I have the gearshift extension cut-down, it is a piece of die cast aluminium and needs to have six inches cut from the centre to put the gearshift in a more comfortable position and allow proper use of the hand brake.
It’s been quite a struggle to make myself get out into the shed of an evening again, what with the night drawing in and the cold and wet weather. Must try harder eh?
Thursday, October 12, 2006
Pleasant surprise
I just a pleasant surprise through from the DVLA, I taxed my 1972 Spitfire last month at the post office. But as I could not change the taxation class there I had to pay the £60.50 to get a tax disc, and then get myself off the DVLA local office to change the taxation class and reclaim the tax.
To my astonishment I had a letter in the post today from the DVLA telling me I had paid too much for the tax, offering me a new tax disc and to pay me back for the tax. Makes a nice change when you get a cheque from the DVLA and a greater surprise when they offer it to you without asking.
To my astonishment I had a letter in the post today from the DVLA telling me I had paid too much for the tax, offering me a new tax disc and to pay me back for the tax. Makes a nice change when you get a cheque from the DVLA and a greater surprise when they offer it to you without asking.
Tuesday, October 10, 2006
RBRR 2006
Over again for a couple of years now, the Round Britain Reliabilty Run organised by Club Triumph was held over the last weekend. The run had 94 Triumph cars starting from Enfield to John o Groats then down to Lands end, finishing back at Enfield, having covered about 2000 miles in 48 hours. When the application forms went out for this run I had no intention of doing it as neither of my cars were in a suitable state, however following a request for a co-driver on the Club Triumph Forum, I put myself forward and was accepted.
The intention was to do the run in a Herald 13/60 estate, but due to some last minute problems they had to change cars and instead used a 2000 Mk2 estate. Perhaps I will do the run in the GT6 for the next RBRR in 2008, but one thing you reay appreciate is having a third person in the car who can navigate whilst the other driver is resting. Perhaps thats why I saw so many Triumph owers with sat nav?
Thanks to Alison and Richard Brake for allowing me to be their co-driver.

Sunday, October 01, 2006
Changing Starters
Well the GT6 project is progressing again with the arival of the starter motor kit, allowing me to fit a modern high torque starter motor to the car. When I tried to start the recently re-built engine, the starter motor did not have enough power to turn it over fast enough, so to overcome this problem I bought a high torque starter motor that was designed to go on a Midi Van.
With a kit from Canley Classics I was able to fit it to my car. Its worth noting that any 9 tooth Nippon Denso starter can be modified to fit your Spitfire or GT6 and can come in a lot cheaper than the ready converted one you get from some suppliers.

I had the added fun of repositioning the adaptor plate on the starter in order to make it fit in the new bulkhead, but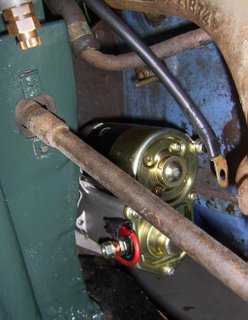 there's what you get for moving the engine.
With a kit from Canley Classics I was able to fit it to my car. Its worth noting that any 9 tooth Nippon Denso starter can be modified to fit your Spitfire or GT6 and can come in a lot cheaper than the ready converted one you get from some suppliers.

I had the added fun of repositioning the adaptor plate on the starter in order to make it fit in the new bulkhead, but
 there's what you get for moving the engine.
Sunday, September 24, 2006
Another weekend on the Spitfire
After driving the Spitfire for a while I noticed the head gasket starting to weep oil, so I re-torqued the head, ony to strip the thread on one of the nuts. Not knowing what state the rest of them might be in I decided to change the head gasket and nuts. I had already picked-up a new-old-stock Payen gasket, you can't trust some of the junk that gets sold but Payen have been well reccommended. The head was reluctant to come off, but with the coil disconnected and a quck flick on the starter the head was free.
It prooved a straight forward job, running the engine for one minute without water then re-torquing the head again. Once the engine had cooled fresh coolant was added and the tappets adjusted. Then for a longer run, once again, just as had after taking the carbs off previously, it proceeded to squirt petrol everywhere from the petrol connections onto the float chambers. Luckily with new petrol pipe and cleaned connections the problem was solved.
But then onto the job which took most of my time this weekend, wiring. On a drive out to the shops on Friday the windscreen wipers, heater motor and tachometer all stopped working, fortunately it was not far to the shop and by the time I got out it had stopped raining.
Thinking it might be a dirty fuse problem, I cleaned the fuses and contacts, but that only appeared to have caused the rear lights, indicators, dash lights and gauges to also stop working. The car still ran though and the hazard lights work all around the car and the front lights worked. It took me a while to work out that the cause of the problem was a lack of pressure between the fuses and their terminals.
All those hours when I should have been working on the GT6, not chasing dodgy connections grrr..
Oh well will try to get something done during the week. ;)
Thursday, September 21, 2006
My GT6, the story so far.. (part 3)
The modifications to the chassis for the engine repositioning took quite a bit of time, with careful positioning of the engine and gearbox onto the chassis to enable me to work out where I would need to cut and re-weld the chassis. The engine and gearbox must have been placed on the chassis about ten times, just to make sure I had cut and welded in the correct positions, a job made quite easy with my tractor, it having a fore end loader. After a weekend of cutting and welding, the chassis was thoroughly cleaned and painted with chip-resistant chassis paint, much better than hammerite paint, which will chip easily and let the rust start.
After finding the poor repairs on the chassis I decided to take a closer inspection of the body and the repairs that had been done. Despite having had a full respray, the welding along the outer sill to the floor pan had only been tacked every inch instead of a seam weld. To solve this I had to clean out as much paint as possible from along the join and seam weld it, whilst not over heating it, to prevent other paint from lifting. That was a really nasty job as I could not remove all the paint from the joint, so all too often I would get splattered with hot paint and the mig welder was constantly getting blocked.
The welding was not much better further round the floor pan, because it was close to the chassis, who ever tried to do the floor pans once again had not seam welded it, instead had chosen to smear some silicone around it to make it look complete, oh well, out with the welder again and dodging the hot flying silicone.

With complete welds, fresh paint on the underside of the body tub and a set of polybushes fitted to the chassis, it was time to fit the body back onto the chassis. The body is held in place by twelve bolts, some of which have aluminium spacers or rubber washers between the body and chassis, which you have to get and keep in place when lowering the body, best held in place with the use of a bit of blutac.
Fitting of the body was followed by the trial fit of the engine and gearbox so I could check for any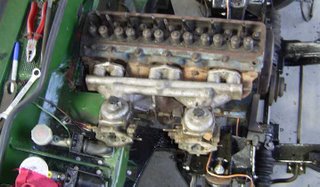 clearance issues. The first issue was quite clear to see once the inlet manifold and carburettors were fitted, the outer face of the carburettor was right up against the clutch master cylinder. Time for another re-design me thinks.
After finding the poor repairs on the chassis I decided to take a closer inspection of the body and the repairs that had been done. Despite having had a full respray, the welding along the outer sill to the floor pan had only been tacked every inch instead of a seam weld. To solve this I had to clean out as much paint as possible from along the join and seam weld it, whilst not over heating it, to prevent other paint from lifting. That was a really nasty job as I could not remove all the paint from the joint, so all too often I would get splattered with hot paint and the mig welder was constantly getting blocked.
The welding was not much better further round the floor pan, because it was close to the chassis, who ever tried to do the floor pans once again had not seam welded it, instead had chosen to smear some silicone around it to make it look complete, oh well, out with the welder again and dodging the hot flying silicone.

With complete welds, fresh paint on the underside of the body tub and a set of polybushes fitted to the chassis, it was time to fit the body back onto the chassis. The body is held in place by twelve bolts, some of which have aluminium spacers or rubber washers between the body and chassis, which you have to get and keep in place when lowering the body, best held in place with the use of a bit of blutac.
Fitting of the body was followed by the trial fit of the engine and gearbox so I could check for any
Monday, September 18, 2006
My GT6, the story so far.. (part 2)
Seeing as I was going to change the gearbox to the overdrive version and that the engine was an unknown quantity to me, I decided to remove the engine and gearbox as one unit, quite an easy job after taking off the bonnet.
Once out and with the head removed from the engine, I could see that the engine was going to need a re-bore, meaning new pistons and rings would also be required. Along with these parts and machining, it was always my intention to have the cylinder head converted for running on unleaded petrol, with this in mind, I chose to put this engine to one side for now and instead use the re-conditioned engine that came as a spare with the car.
Now despite being re-conditioned, the engine still needed going through, having spent a few years under the previous owners bench with the head removed. It was just as well I did this as I found the big-end rods and end-caps had been mixed-up, not good as they are machined pairs and should be kept together.
Around this time I had been following some of the message threads on the Club Triumph Forum, in which other GT6 owners were discussing how they had improved their cars. One of the disadvantages of the GT6 over the Spitfire is its poor cornering ability, due to one third of the engine being mounted in front of front wheels, to overcome this problem, the whole engine and gearbox assembly can be moved back by about 6 inches. To do this you need to fit a Spitfire front engine plate, modify the chassis around the bell housing and rear of the gearbox, modify the bulkhead, used a shortened prop shaft and cut-down the gear change mechanism, none of these jobs were particularly expensive, just time consuming.
 Having decided to move the engine back. I chose to lift the body from its chassis, as it would give me the opportunity to thoroughly clean, check, service and paint the chassis. With the chassis out it was easy to see that little or no work had been carried out on it, despite the body having had new panels and a re-spray. One of my major concerns about the chassis came soon after lifting the body, I found that one part had been covered by braised on plates, these were soon removed to reveal a very patchy looking chassis member. I chose to cut out this rotten piece and replace the section; it should be a lot stronger now and less prone to anymore rust coming from beneath it.
Friday, September 15, 2006
CV's are go.
The CV conversion is nearing completion after I picked-up the adaptor plates from Davesideways last Sunday. This drive shaft set-up should solve the weak points of the original set-up. As I brought the car, it had the rotoflex drive shaft fitted, as were all MkII and MkIII GT6's until 1973.
The idea behind these rotoflex couplings was to eliminate the tuck-under problem that occurred on the rear wheel on hard cornering, by giving more flexibility of the drive shaft, so the wheel would stay on the road. The problem with these rotoflex couplings is the amount of backlash that occurs when taking power on or off the rear wheels; this can be an issue when cornering.
Another problem with these couplings is the quality of the modern alternatives, I fitted a set on my car soon after getting it, a month after fitting they had already started to crack :(
The inner CV joints are from a Volvo 340 and took quite a bit of finding. You can buy them new for about £45 each or, as I did, get a pair from a car breakers, I found mine by searching on eBay for people breaking or selling parts from Volvos and then asking them whether they had the CV joints. In the end I brought a drive shaft complete with a pair of CV joints from North West Volvo Parts (01942 322880) The new drive shafts are from a Rover Metro/100, where you use two near-side shafts (the shorter ones) to go from the inner Volvo CV joints, these came from Atlas Salvage (01744 612712)
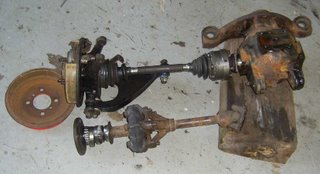
The whole assembly was a lot easier to fit together than the old rotoflex system, as you do not have those rubber donuts to deform to make it fit. If it was not for the fact that I had not fitted the drive shaft fully home into the outer CV joint, I should have been able to fit both sides on the car in one evening. Just got to remember to check the clearance between the inner CV boot and the chassis, can not be sure of it until the car has settled on its springs, I may need to fit a smaller CV boot.
Sunday, September 10, 2006
A weekend off.
Armed with a fresh MOT I decided to have a weekend off from working on cars, so I took myself down to the country show at Barlylands Farm near Billericay in Essex. I left Wales at about 3am, so to give myself a chance of a clear run across the county, down the M4 and half way around the M25. It took just under 3 hours, only slowing for roadworks. In Billericay I met up with a few friend and travelled the last few miles in a Sentinel S4 steam wagon. Didn't do much for the rest of the day, was starting to feel a little tired by 3pm. Went out again in the evening on the steam wagon to find some fish and chips and then bach to the show again to find the beer tent.
On Sunday I took a leisurely trip back to Wales, taking a longer trip, stopping in Cambridge for a breakfast and then via Northampton and Gloucester to avoid the toll bridge. The advantage of going this way round was that I was able to pick-up the spacers I need to finish off the CV conversion, just need to get the right bolts then I should be able to fit it all together. See the link for The Crazy Spitfire blog on the right hand side to find out more.
 the beer tent.
On Sunday I took a leisurely trip back to Wales, taking a longer trip, stopping in Cambridge for a breakfast and then via Northampton and Gloucester to avoid the toll bridge. The advantage of going this way round was that I was able to pick-up the spacers I need to finish off the CV conversion, just need to get the right bolts then I should be able to fit it all together. See the link for The Crazy Spitfire blog on the right hand side to find out more.
Thursday, September 07, 2006
MOT time.
Work on the GT6 has not progressed much in the past month due to work on my other car, a 1972 Triumph Spitfire 1500. The Spitfire uses some parts from a 1976 Spitfire I had on the road previously.
It was a case of second time lucky with the MOT, it failing on two points, low handbrake efficiency and corrosion on the chassis.
The chassis corrosion was on the out-rigger, where it attaches onto the main chassis rail, this was quite easily remedied by cutting out the corrosion and welding on a plate between the out-rigger and the main chassis rail, that welder I brought a few months ago is really showing its worth now.
The handbrake efficiency is a well know problem for the Spitfires and GT6's. Made more difficult for me as I had just replaced the rear handbrake cable and it had not yet straightened out yet, so it would not release properly.
Anyway, the Spitfire now has a MOT and is legal for the road, because it was made before 1973, it should be tax exempt, unfortunately in order to change the taxation class I need to go to my local DVLA office and I can only get ther by using my Spitfire, meaning I have had to pay for road tax, should be able to get most of it back after the taxation class has been changed.
Atleast I can resume work on the GT6 again, hopefully.
Wednesday, August 30, 2006
My GT6, the story so far.. (part 1)
Back in February 2006 I purchased a 1972 Triumph GT6 with a view to getting it back onto the road in three months. The car was a abandoned resoration, it having had quite a number of new panels fitted and then a full re-spray in dark rover British racing green.
Along with the car came a set of four spoke revolution alloy wheels, a reconditioned MkIII GT6 engine, a three rail overdrive gearbox and a pair of fixed back bucket seats.
Having trailered it out of the previous owners garage and back to the farm where I am working on it, the first problem I noticed was that one of the rear wheels was rubbing on its shock absorber. Taking off the wheel revealed somebodies attempt at repairing the upper shock absorber mounting, while the repair might be strong it was in the wrong place, pushing the shock absorber too close to the wheel, so there was one of the fist jobs on the list. Fortunately by turning the shock absorber upside-down there was enough clearance to move the car around the workshop, but it would be no good to drive it like that.
A few days later I recieved a new pair of rotoflex drive couplings from T.D. Fitchett, as the ones on the car were well cracked and ready for replacement. These were soon fitted, the hardest part being the refitting of the transverse spring and rods onto the upright. For about a month after this other jobs around the farm, busy (paid) work and other projects I have running prevented me from working on the GT6.
Getting back to the GT6 after this break I moved it around the workshop, only to notice that my new rotoflex couplings had already started to crack, I could tell these were not going to last long. Around this time I had been following the Club Triumph Forum and developments made by Josh Bowler and Nick Jones, their set-up uses constant velocity (CV) joints instead of universal joints and the rotoflex coupling, this had to be the way forward. The CV rotoflex conversion uses a Volvo 340 CV joint in place of the universal joint, a metro driveshaft and a MGF hub and outer CV joint in place of the rotoflex joint. To enable use of the MGF hubs, the rear uprights were machined out to accept MGF bearings by Ariel Machine Products in Caerleon.
Along with the car came a set of four spoke revolution alloy wheels, a reconditioned MkIII GT6 engine, a three rail overdrive gearbox and a pair of fixed back bucket seats.
Having trailered it out of the previous owners garage and back to the farm where I am working on it, the first problem I noticed was that one of the rear wheels was rubbing on its shock absorber.
 Taking off the wheel revealed somebodies attempt at repairing the upper shock absorber mounting, while the repair might be strong it was in the wrong place, pushing the shock absorber too close to the wheel, so there was one of the fist jobs on the list. Fortunately by turning the shock absorber upside-down there was enough clearance to move the car around the workshop, but it would be no good to drive it like that.
A few days later I recieved a new pair of rotoflex drive couplings from T.D. Fitchett, as the ones on the car were well cracked and ready for replacement. These were soon fitted, the hardest part being the refitting of the transverse spring and rods onto the upright. For about a month after this other jobs around the farm, busy (paid) work and other projects I have running prevented me from working on the GT6.
Getting back to the GT6 after this break I moved it around the workshop, only to notice that my new rotoflex couplings had already started to crack, I could tell these were not going to last long. Around this time I had been following the Club Triumph Forum and developments made by Josh Bowler and Nick Jones, their set-up uses constant velocity (CV) joints instead of universal joints and the rotoflex coupling, this had to be the way forward. The CV rotoflex conversion uses a Volvo 340 CV joint in place of the universal joint, a metro driveshaft and a MGF hub and outer CV joint in place of the rotoflex joint. To enable use of the MGF hubs, the rear uprights were machined out to accept MGF bearings by Ariel Machine Products in Caerleon.
Monday, August 21, 2006
Line 'em up
Not having enough to do with trying to keep a Spitfire 1500 on the road as well as finishing my GT6, on Sunday I picked-up another GT6 body shell. This shell came from a Triumph GT6 that is in the process of being changed into a convertible GT6, where the GT6 shell is replaced with a Spitfire shell.

The long term prospect for this shell is that it will become a trailer to go behing my GT6 (once I get it on the road)
I shall either make a custom chassis to go under it or instead utilise a old caravan chassis.
The shell would be in need of quite a number of new panels to use it on a car again, all of which are available but at a cost.
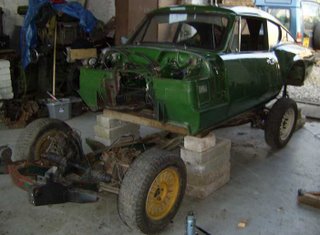
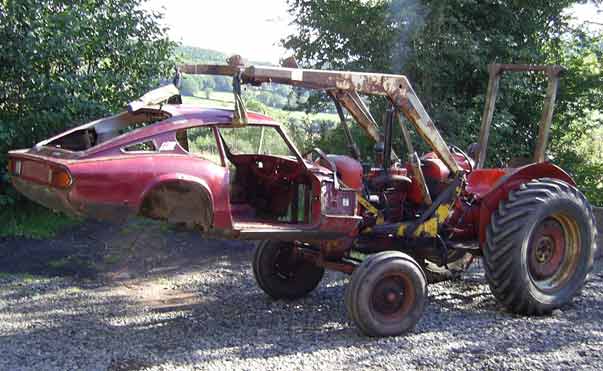
So for now the shell has gone into storage with a view to start wokring on it next year. The picture shows the new body being unloaded by my Nuffield 10/60 tractor, a toll which has become very usefull for moving car parts around.
The long term prospect for this shell is that it will become a trailer to go behing my GT6 (once I get it on the road)
I shall either make a custom chassis to go under it or instead utilise a old caravan chassis.
The shell would be in need of quite a number of new panels to use it on a car again, all of which are available but at a cost.
So for now the shell has gone into storage with a view to start wokring on it next year. The picture shows the new body being unloaded by my Nuffield 10/60 tractor, a toll which has become very usefull for moving car parts around.
Sunday, August 20, 2006
Here it begins
Hopefully the first of many postings to my new blog.
Just a brief bit about me, I have owned a Triumph car for the past nine years, starting off with a Spitfire 1500. For much of that time I could not afford the insurance, but since getting a job, things got a bit easier allowing me to use my Spitfire as a daily driver.
My Spitfire 1500 has prooven to be a reliable car when, for one year, I would drive to Northampton for university and back to South Wales for work every week. It is in no way a concours car and has always been a running restoration.
In February 2006 I bought myself a Triumph GT6, a two litre version of the Spitfire with a fastback roof, this I have chosen to be my new project car. Plans include updating of the car to aid modern driving.
 More about this car soon...
Just a brief bit about me, I have owned a Triumph car for the past nine years, starting off with a Spitfire 1500. For much of that time I could not afford the insurance, but since getting a job, things got a bit easier allowing me to use my Spitfire as a daily driver.
My Spitfire 1500 has prooven to be a reliable car when, for one year, I would drive to Northampton for university and back to South Wales for work every week. It is in no way a concours car and has always been a running restoration.
In February 2006 I bought myself a Triumph GT6, a two litre version of the Spitfire with a fastback roof, this I have chosen to be my new project car. Plans include updating of the car to aid modern driving.
More about this car soon...
Subscribe to:
Posts (Atom)
