Thursday, December 16, 2010

GT6 Bulkhead reconstruction part 2

With the recent cold weather we have been having I've not been so keen to work on the car recently, but I had agreed to move the body over to a bodyshop this week, so I wanted to get the bulkhead finished off if possible.
I don't have and in progress pictures this time, but once again  the floorpan has been remodelled and the new bulkhead section welded in place, though this time the piece was fabricated.


Back inside the car, one of the radius arm strengthening brackets has been moved across, this is because the body was swing spring and will be going to Jones/Bowler CV.

I've made a start on the other side, unfortunately this bracket has had plates welded over it, but I found a decent one on my other spare GT6 body.


The body is now over at the bodyshop to have the rear light panel, rear wing and outer arch fitted, which they reckon they may have done by the end of the week, then it's back to me to finish the bracket on the heel board, repair both toe boards where it bolts down through to the chassis, patch a couple of holes on the back of the screen frame, put a new lip on the leading edge of the roof and if there is time, seem seal and paint the inside, all ready from paint in February, at least that's the idea

Tuesday, November 30, 2010

GT6 rear wing preparation

After pulling out some dubious repairs from the rear wheel arch I worked out that the left hand rear wing had already had three repair panel welded on. The trouble with this is that the panels were not very good and had a thick layer of filler over them to cover it up, so I decided to get a new wing.
The complication here is that the fuel filler cap is in this wing and the company that produces this wing do not do the pressing for the fuel filler, but one of their suppliers could do the pressing, so I ordered an appropriate wing from them. Unfortunately it was not quite as I had hoped, the red one below is an original and the black a re-pro pressing.


I asked the company if they could do better and they said no, so the wing was exchanged at their cost for one without a filler hole and I set about moving a filler hole across. I started by marking up all the parts with masking tape to give me reference points of where the filler hole should be.


Then the filler panel was trimmed down and a hole cut in the new wing to allow me to drop the piece in before doing the final cut around, just in case I had it in the wrong place.


Once happy with this, the proper size hole was cut in the new wing before welding the hole in place. 


It's going to need a bit more finishing and possibly a skim of filler before paint, but I'm fairly happy with the result and glad that I should have something that looks right when fitted.  

Wednesday, November 24, 2010

GT6 Bulkhead reconstruction

A bit more fabricating and welding done this weekend. The vertical closer panel on the passenger side of the bulkhead was cut and folded.

The problem with this is that the new bottom corner of this panel reaches out over the floorpan. Having some spare floorpan parts, I decided to change the shape to make it all fit and look better.
Replacement section in place prior to cutting and welding.


Replacement piece welded in with the top hole filled in and the old corner of the floorpan cut out so not to create a redundant cavity.


And this is how it soon looked, with the bulkhead started to be welded in and some of the holes in the bulkhead being filled in. There is still quite a bit of grinding back to be done and pseudo spot welding between the bulkhead top and the vertical panels, then it's onto the drivers side, which will be more complicated again as the panels have to give room for the starter and clutch slave cylinder.


Later on, the top of the drivers side bulkhead finally buzzed in, which meant I could decide on the final position of the master cylinders, which have also been modified and welded together.

Thursday, November 11, 2010

GT6 Bulkhead mods

With a few other jobs out of the way I've started back on the replacement GT6 body with a bit more choppy chop around the bulkhead. 
As you can see from the pics below, I had already started on the drivers side before I remembered to take any pictures. The sides of the area around the pedal box have been boxed in and a new piece put in beside it to give more space for the air box.

As it was a few days ago


Remaining redundant top of bulkhead and front of tunnel cut off


New top of bulkhead positioned for the camera


While I am doing the welding around here I'll fill up the hole for the fuse box and all of the redundant holes also. At the same time I am thinking of re-positioning the wiper motor, as I have seen done before. This should make for a slightly less cluttered bulkhead and while I'm at it, I'll see if I can fit a more modern wiper motor, you know, one of those which actually go fast when you put it on the second speed, unlike some of the Triumph offerings.

Monday, October 25, 2010

Master cylinder mods

I've been able to make a bit more progress on the replacement body over the last few days, the replacement rear light panel is now fully trimmed back and I've made a start on trimming back the area it has to go into.
Meanwhile at the front I've been looking into the bulkhead mods again, with the benefit of hindsight and more time I'm going to try and make a neater job of it and try to make it look as factory spec as possible. This will mean putting the lip back on the top of the bulkhead shelf, keeping the factory size radii on the corners of the new parts of the bulkhead and replicating the detail of how the bulkhead finishes to join onto the tunnel. So far there has been a fair bit of head scratching and wandering between car bodies to work out how best to do it, but hopefully it should be worth it.

The area I looked at next was been the master cylinders, last time I just put the two master cylinder brackets next to each other and cut a new hole in the bulkhead, but that looks somewhat scruffy. This time I plan to do something like Dave has with his K series and fabricate a new bracket for the master cylinders, with a repositioned reservoir for the brake, then cut out and re-weld the pressing for the hole in the bulkhead.
I'm hoping I can find an appropriately size brake fluid reservoir to be able to keep it somewhere on the bulkhead and at the same time put the support/brace/bracket next to the master cylinders on the bulkhead.


A few days later I received a new master cylinder reservoir, the good thing about this one is that the outlet of the reservoir is offset, so it gives me enough space to open both master cylinder caps.


The problem I had is that it still sat a bit too high. The height can be reduced a bit by cutting down the thread, but that's not going to be enough. As I will have to fabricate a new bracket for the master cylinders I will change the angle of the bake master cylinder, making them more horizontal and giving me more space.
So this is what it looks like now with a mocked-up brake master cylinder, the reservoir should go down a bit lower again.

Tuesday, October 12, 2010

GT6 rear end damage &starter heat shield

I spent a bit of time having a look at the dent in the rear of the new GT6 body, making a start by removing the lights and other trim. The rear deck, valance and light panel are all damaged, so at present I plan to replace just the light panel and try to straighten out the other panels.


I've also been out to the long term storage area to retrieve a few parts from a mostly rotten bodyshell. Much easier to carefully remove the light panel in the workshop in the dry and on the bench. It'll also give me a at hand reference of how the rear deck should sit.


Decided the first job was to remove the old light panel, I was going to carefully drill out all the spot welds, but soon gave-up on that idea and just cut the whole panel out. I've been able to make a start on smoothing it all out again, but I'm all too aware of my lack of experience and the risk of making things worse if I spend too long hammering in the same place, so I'll leave it for now and concentrate on panel preparation before getting some professional advise.


A problem I had with the GT6 last time it was out was that when hot, the starter would refuse to go and just blow a fuse. I've since been told that this is quite common with the modern type starter motors as they really don't like getting too hot. So rather than fit a heat reflective type blanket over it I decided to make-up a heat shield.
The CAD (cardboard aided design) was cranked into action before transferring to aluminium to produce a heat shield, which to pleasantly surprise me, fitted first time and was still easy to get into and out of position. While doing the job, I decided to replace the pozi-drive screws with allen-head screws to make for easier servicing of the starter as it is a pair to remove the whole unit, though I hope I won't need to again for a while now.


It has survived a quick run to the shops and seems to be doing it's job so far, so I can't complain at that really.

Wednesday, October 06, 2010

A new body

Since getting all despondent about the condition of the GT6 body I'd been on the look-out for another one, so I put a few feelers out, contacted some of the Triumph traders/breakers and eventually found something which was reasonably close, solid and had not been bodged too much by a previous owner. Unfortunately there were a couple of obvious issues with the one I found, it came with the rest of a almost complete vehicle, so I would have to separate it and find a home for the running gear and the body had sustained some rear end damage, but again this was not too much of an issue as I already had a second hand light panel which could be fitted.
A deal was soon done and a couple of days later it was in the workshop


It took a couple of hours to prepare it for removal of the body and another hour to lift it off , not too bad as I was doing it by myself with jacks and blocks of wood.


With the body removed I gave the running gear a quick wash, took some pictures and put it up for sale on a few websites and within 24 hours I'd received a deposit for the running gear, at least that went quickly and smoothly.

Tuesday, September 28, 2010

GT6 bodywork decisions

In the eighteen months or so the car has been on the road the bodywork has deteriorated quite badly, with signs of rust coming up along the top of the windscreen frame, along the rear wing repair sections and numerous spots of corrosion looking like they might push through the paint. In addition to this, the drivers side sill was not put on correctly, giving poor gaps all around. Oh how I wish I knew more back then when I bought it.


In a bit more detail, the front of the roof has obviously had a fair bit of rust in it, meaning that it has been repaired, but not very neatly with varying thickness's of filler and was not sealed off properly, hence the rust starting to come through again.
Both inner rear wheel arches need replacing and there are dubious quantities in the outer arches.
The top of the windscreen surround looks to have been re-modelled as the curvature has been lost, probably replaced with flat sheet.
Both sills have been fitted too far back, not so much of a problem, but one side was also fitted way out of line of the door, see pic above.
It seems that when the sills and floor was replaced on the drivers side they did not bother to check the door gap, so that side will always be too small.
In addition to this there are numerous small patches of rust starting to bubble up through the paint
If it was just one or two of the above problems I would not have been so concerned, but I am not sure if it would still be economic to try and repair this body. It's not going to fall apart or fail an MOT in the next year or two, but I rather be prepared and catch it before it catches me.

All this makes me want to get one of Graham's T6 bodyshells, but at the moment it would cost too much. So that leaves me with a couple of other options, get another shell, with the risk of finding equally shoddy repairs already carried out on it or get mine repaired. I'm warming to the idea of finding a less molested body to restore and modify myself gradually over the next year or so in readiness to swap over as this will give me the opportunity to do some of my modifications a bit more neatly.


Monday, September 20, 2010

New Airbox

I've picked up the air box for the GT6 as they had finished the TIG welding. Seems they spent quite some time on it with the two long seam welds required and there was very little distortion. The box is held in place with dzus fasteners and seal with a closed foam single sided adhesive strip.


It was a concern that the air inlets might not be big enough, they certainly did not look quite right. The long drag up my favourite hill seemed to confirm my suspicion and it is down on power, so I need to go for larger inlets. I'd really like to go for a pair of 3" (76mm) inlets, but the issue then becomes how to route the two large pipes to the front of the car, a bit more head scratching required here I think.

Friday, September 17, 2010

Castle Combe trackday

So quite a few months ago, June actually, was the Castle Combe trackday, my first time out on track. On the first session time seemed to pass exceeding fast, unlike my driving, but I survived. Through out the day my ability to keep up with the other traffic improved and the car only gave me one problem, a leaky rocker cover gasket, which was soon solved with liberal amount of silicone sealant.
A couple of observations from the day, my 'temporary' throttle cable mount could do with stiffening-up or replacing as despite having little slack in the cable, the mount would bend, giving a delay between pressing on the pedal and the butterflies moving. The standard brakes seem perfectly adequate for my driving on that circuit, so no need to worry there, if anything I needed to brake less into corners and carry more speed through.

The front left tyre seems to have come off the worst, not sure if this is my driving style or just due to the rotation of the circuit.


Other pics nicked from over the internets with appologies to Smithy and RoyBoy


There are more pictures to be seen in my Photobucket account and if you are a Club Triumph member, a better write-up of the event in the latest magazine.

Thursday, August 19, 2010

More updates, airbox thoughts

Work continues on the airbox and I've had a couple of quotes for aluminium cut to size for a backplate and sealing ring, £40 + VAT and delivery for the pair, so I doubt it's worth trying to make one myself or buying and cutting a ITG one.
So the plan at the moment is to have the aluminium backplate and ring supplied, that's the yellow and the blue parts in the cad image below, and then form the rest of the airbox from fibreglass or carbon fibre.
I'm not sure at this stage whether to bond the sealing ring into the airbox or just have it on top to spread the weight.


The best quote I had for the backplate was £30 plus delivery and VAT from LaserMaster, so I confirmed the drawing and paid them yesterday morning and this morning the parts were delivered.


Next job is to finish off the grommets, the ITG ones had a very large OD, meaning they would overlap, so instead I have managed to find some wiring grommets, though these need slight alteration to fit.
I was pleasantly surprised with the service after another company, who quoted £40+ also would only start work after the cheque cleared, LaserMaster took payment over the phone.
The first trial fit looks OK, I'm going to have to fettle one or two of the holes though to make it fit better (my measuring inaccuracies) and then add a mounting point or two back to the inlets to hold it steady.


Then I thought I'd make a start on the airbox, first step was to find something I could mould into the shape of the airbox to lay the fibreglass onto. First thought was to use that green flower arranging foam, oasis, but I couldn't find a large enough piece locally, so I got creative with a cardboard box, some plastic and a can of expanding foam to make this:


Which was roughed out to this, using a jack saw and rasp:


Before adding radii, covering in tape and trial fitting one of the air inlet pipes, which will be moulded in with the fibreglass:

Wednesday, August 18, 2010

Overdue updates

Right, so this blog has gone from being a bit out of date to being very out of date, so it's time to get things back on track.
Following my last missive, the inlet manifolds now all match-up with the head a lot better now after a bit of fettling and I've managed to get most of the butterflies to seat a lot better, one is still a lot worse than the others, so that manifold will have to come out again. The trouble is that the manifolds and butterflies are all clean and I have heard people say that they are a pain to seal up again when clean.
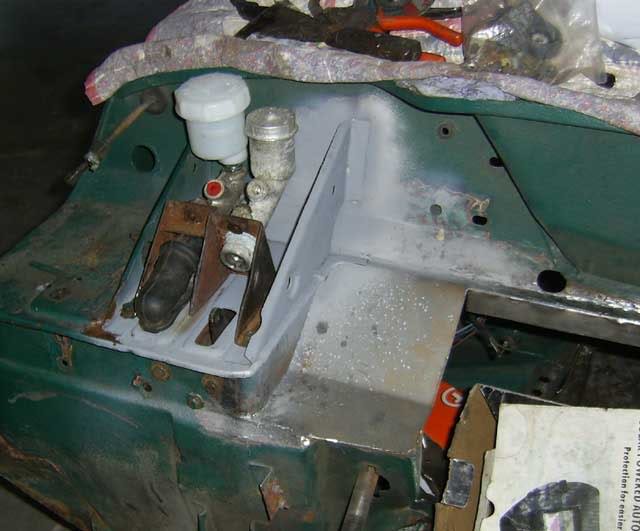
Engine mounts,
This is the new design, it uses the original bracket with heavy box section and a tube welded on the end for the bolt to pass through to the new rubber (Jaguar E-type)
The pic below shows how much the rubber has sagged and the new bracket behind it prior to being tacked in.


I fitted the newly modified engine brackets and I am pleased to say that so far there is no noticeable increase in vibrations or noise from the engine.


All the butterflies in the inlet manifolds fit a lot a better now and other air leaks from the top of the manifolds have been sealed off, so I can have the engine tick over at 600rpm again if I wanted.
Driving around, I can sometimes hear a knock from the back and some of the blue Polybushes fitted do not look as good as they should, so I will probably end up replacing those with Superflex ones.

The next area I feel I should concentrate on is air delivery to the inlet manifolds. All of the components for this need a good bit of thinking through, the basic plan though is to have a box over the manifolds, fed by colder air from the front of the car.
Considerations to be made;
  • Air box backplate buy or make? - Both ITG and Pipercross sell them for around £30, but they are only pieces of alloy sheet with fasteners
  • How to secure the backplate to the ram pipes? - Again ITG sell these, but £8 for a grommet
  • How to seal the backplate to the air box? - Adhesive foam? rubber?
  • Where to route the pipe/s to the air box
  • Where/how to induct air into the pipe? - Under the radiator, but not so low that it picks up water?
  • What size pipe/s to the air box? - I'd like to have two feeds so not to starve one end of the engine

I've seen Pipercross and others sell air boxes of a suitable length, but at over £200, I'd rather make my own from fibreglass or Carbon Fibre and have something that is exactly what I want.

I've been going through some more of those finishing off jobs. The Facet low pressure primer has now been replaced with the pump from George, fortunately it has the same mounting centres as the previous pump, so it made for easy fastening down and I now have two quieter rotary fuel pumps.
The search for the elusive speed vibrations have led me to reduce the gap between the bonnet and sill on the passenger side, so the bonnet assembly no longer vibrates as much at speed. In addition to this, the rear tyres have now been replaced with Conti Eco Contacts and doing these two things have really made the car much more steady.

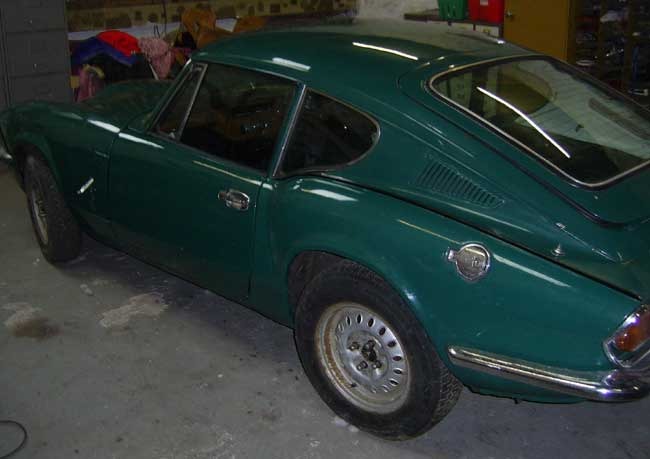
Had the Bank Holiday over in East Anglia, which meant doing a bit over 400 miles in the GT6, the miles just flew by and it was a pleasure to drive, much changed from 18 months ago.


Unfortunately my camera did not get any video from the last rolling road session, but I have put together a video from footage collected by Alex at Maynards. GT6 PI on the rolling road

Friday, June 25, 2010

Rolling road time again

So we had a long afternoon at the rolling road, where we did runs with the GT supplied head and again after changing the later CR type inlet manifolds for the earlier CP manifolds, which have be machined out to enable the CR throttle spindles to be fitted. Ram pipes have also been fitted to the new manifolds to increase the inlet length.


Torque


Power


Blue run is prior to the head change, but still injection and CR inlets.
Green run is with the new head, but still injection and CR inlets.
Black run is new head and CP inlets and ram pipes.

It is clear to see the improvements with the new higher compression cylinder head, giving more power and for longer and the CP inlets giving an extra eight or nine BHP. The engine is still fitted with the relatively mild stock MkII camshaft.
Surprisingly the fuelling is still alright everywhere apart from idle, giving figures, if I remember right, of 3.8 to 4 over the rev range.

I've still a bit of fettling to do to get the inlets to match the ports properly as we were running out of time and I also need to consider making a cold air feed as it does seem to be quite sensitive to temperature.


I'm pretty chuffed with the results, it's all taken a fair bit of time to get this far and I'm sure there is plenty more to be done, but it has given me the ability to see the improvements and gains by fitting the right parts. Also interesting to see how much can be done with a stock camshaft, goes to show that some of them aren't all that bad.

I'll probably end up fabricating a custom air box to give plenty of space around the trumpets and have a couple of cold air feeds. There are air filter baseplates approximately 500mm long, which would be perfect for this, but the filters that fit onto these are around £125, so I may buy an un-drilled baseplate and fit my own box onto this and have filters in-line or at the end of the cold air feeds.

Sunday, June 13, 2010

New towers and head fitted

Got the modified suspension towers fitted in the week, though I still have to fit the wiring and coolant pipes back around them and I'll leave the steering column out until I have changed the head. Not the easiest of jobs to do with the engine in place as you of course have to have the chassis on stands and then support the engine as you swap the towers over. Having the single multi-way plug on the steering column made it a doddle to remove.
Next job is to check torques, fit the wiring and coolant hose back in before checking the starter and swapping the head, then I could thing about finishing off the new engine mounts.


Then it was time for the head change, the old head was removed quite easily before cleaning off the block and a new Payen head gasket fitted before re-fitting the starter and water pump.


So I got the GT6 running again on Saturday with the new head on. Took me a while to get it started as the injectors needed priming and then I must have flooded it in a bad way, so I took the plugs out to clean them up and re-gap (should have done this when I went over to Megajolt ) and left them out while I went for lunch. On returning I wanged the plugs back in and it started up straight away.
With the new head it seems to rev much more freely, being all to easy to spin up to 6,500rpm, where before it was a bit of a struggle to get up to 6,300rpm. There is still a bit of a dip in the torque around 2,800rpm, but it soon picks up again, perhaps this could be ironed out on the rolling road.

Covered an easy 200miles in the afternoon on a drive over to Builth and found some good roads to drive once you get past the people pottering along at 45mph I'm not sure whether it's the car, me or both, but I feel a lot more confident driving the car now than when I did when it first went back on the road, just learning how to drive it?
One thing I did see from the run yesterday was that, despite the reasonably warm weather yesterday, the engine temperature was pretty well pegged at just over half way and the fan never came on, even in the slower moving traffic. Not too bad for a second hand pug radiator, but I may well change it for a new one as some of the cooling fins are looking a bit flaky.

It did reward me this morning by leaving a pool of brake fluid on the floor, a leak from the master cylinder. Fortunately I had a spare master cylinder, but the lid will not unscrew, so I exchanged the piston with seals and re-bled the system and it has been fine since. Makes me wonder if I ought to get in a spare set of cylinder seals just in case.

The next job to do is to finish off the new engine mounts, really don't like the look of the existing ones and how they are cracking.