Monday, December 17, 2007

GT6 gearchange shortening

Work on the GT6 is progressing, albeit slowly at the moment. Since I have moved the engine back in the chassis of the GT6, a number of components need to be relocated or modified in some way. One of these parts is the gearchange mechanism, a fairly straightforward job of reducing its total length by six inches.
So, the first job was to dismantle the mechanism, to separate the cast aluminium housing from the other components. To do this a small roll pin (1/8th inch) had to be drifted out to release the overdrive inhibitor block and then the selector arm released by removing a bolt.

With that out of the way a six inch section was carefully cut out of the housing and then sent off to J&J Engineering near Swindon to be joined back together at the new length. Meanwhile, a control rod from inside the housing has also been reduced in length by six inches, although it was not quite as easy as just cutting it down.


The end of this rod has to mate up with the gearstick, so has a long slot down the centre and a hole through it for the bolt. Originally this would have been cut using a milling machine, but as I do not have one here, the piece was carefully marked out, then cut by hand using a hacksaw and finally finished off by file. It's not perfect, but should do the job.
For good measure, new "O" rings have also been fitted to the aluminium housing around selector shaft.


The saloon has been putting up good service again, taking me to Leicester to meet-up with Jony5 from the Club Triumph forum and see my mate Simon to get some php programming done for the Cambridge Museum of Technology website.

My entry for the Club Triumph 2008 Round Britain Reliability Run (RBRR) has been accepted, coming in as entry number 31. As before, the run takes place in October over 48 hours, starting from Enfield in London on a Friday Evening, to John O Groats for Saturday Breakfast, down to Lands End for Sunday Breakfast and then back to Enfield for Sunday evening, should be fun.

Wednesday, November 28, 2007

More dents be gone

After a few days of being depressed with the weather and inactive on the Triumph front, I finally had a fit of enthusiasm and decided to start pulling out the remaining large dents in the 2000. At some point, the car has had a powerful smack in the rear end, pushing the rear bumper forward and in the process denting the rear valance and deforming the rear quarter bumpers.

After removing the rear bumper, I resumed using my favourite dent removal method, viz. a ratchet strap and a heavy object, this time the heavy object being a barn, hopefully not much chance of that moving.
With the car in gear and the hand brake on hard, the dent was eased out by pulling on a bolt through the rear bumper mounting point, whist at the same time it was given a few sharp blows with a hammer to help shock the dent out.


Once again, this method seems to have worked out quite well, the only panel issue remaining being a crease on the left hand side above the bumper. This crease did not come out when pulling on the mounting hole, so will have to be pulled out a bit more by welding a nail to it and then pull on that again, a job for another day.

Popped over to see Dave (sideways) Powell last night to see about a bit of work on my spare gearbox and a natter. Is always fun going to see Dave, as the road between Ross-on-Wye, M50 roundabout to Much Marcle can be a big ball of fun to drive, with a mix of good gradients, slow and fast corners, giving me a chance to see how the 2000 handles.

Saturday, November 17, 2007

A sound improvement

Have been looking into the reasons for the whistling noise inside the 2000 when I noticed a steady stream of cold air coming into the car around the passenger door. A few weeks ago I bought a length of door seal to replace the section on the drivers side door, but noticing the air coming in, I chose to fit it onto the passenger door instead, now this was not as quite as simple as you might hope.
Looking at the seals on the passenger side doors, the seal was one way around, but on the drivers side, they were the other way, so which way to fit the new seal? After looking through my workshop manual, to find no useful information, I decided to copy the drivers side and success. On my next trip out that annoying whistling noise had disappeared.

Work continues on the passenger side front wing, removing the final traces on the dent, it's getting better now, I just need to find the right day to set about spraying it, which could be a bit of a job in itself given the colder and wetter weather at the moment.

For a change I have been going a bit of work on a GT6, not mine unfortunately, but one belonging to a guy from the Club Triumph forum. He told me he thought the brakes were not very good, well we found out why today, the front passenger side caliper was siezed, as was the rear drivers side slave cylinder, no wonder it did not stop very well.
While I was there, I also checked the trunnions and wheel bearings. The trunnions were full of grease and the wheel bearings did not have enough, so that was soon rectified with fresh gear oil in the trunnions and some more grease for the bearings. Should be alright for a MOT soon after it has battery clamp fitted and a new seal put on the filler cap.

Monday, November 05, 2007

A few more little jobs

Have been working around the 2000 again, catching up on some of those small but never the less annoying little jobs.
For a while now the car has not had a drivers side parcel tray, which fits under the steering column and can be very useful for holding bits like mobile phones or cash. Trouble is that these trays are not to easy to get hold of, second hand ones normally water damaged from leaking windscreens. I did however manage to find a Triumph parts breaker who wanted £30 for one, which I guess is a fair price, but they would only accept payment by cheque and I would be buying it unseen with no guarantee of the quality of it.

At this point I remembered I still had the front parcel tray from the Dolomite 1500 I scrapped a couple of years ago. So after a bit of cutting and a new outer bracket made up the tray was soon fitted, saving me £30 and having it fitted a week sooner than if I bought the second hand one.
I will probably still keep an eye out for a proper MkI parcel tray, but for now this ought to do for now and might even fit the radio in.

One of the rear light clusters had a cracked lense, so I managed to pick-up one cheap on eBay and give it a through clean before fitting, you can really see the difference between the two in the picture. Unfortunately the other side was not so keen to be removed for cleaning, needing one of the securing bolts to be cut out. It seems the gasket for the lense had been leaking, corroding the fixing bolt. Luckily I had another backing piece, so this was not a problem, but it will need a new gasket to prevent water getting back in.

Meanwhile I have finished stripping parts from the MkI spare front end. There was not much left worth having after the two wings and the nose cone, but I did remove steering column and the pedals, as they are useful for anybody who is converting a MkI 2000/2500 from auto to manual. If you want those pedals or the column, please contact me through blogger or PM me (SpitBang) on the Club Triumph forum

Tuesday, October 23, 2007

Door hanging and a bit more bodywork

After what seemed like the whole day, I have managed to re-fit the drivers door of the 2000. It turned out to be a right swine of a job, having to drill out all three parts of the hinge pin. The longest part of the pin was easier to drill out, as this could be done on the bench. The other two parts were not quite as easy, having to be done on the car, with limited clearance between the hinge body and the wing.
Not being able to fit a electric drill or even a Dremel in the space, I ended up using a old hand drill with the top removed to let me get a straight line between the two parts of the hinge. It is still not perfect, but at least now the door shuts a bit better and can not open so far that it hits the wing.


Decided while I am waiting for the GT6 to return that some more of the bodywork on the 2000 should be seen to. The car has had a dent in the passenger side front wing for at least two years, when the previous owner acquired it, so it was about time something was done about it. Now, the car came with a complete front wing when I bought it, but I did not want to get into a lengthy bodywork job of replacing the whole wing.
Instead I went for the cheaper option and decided to have a go at pulling the dent out, the proper way of doing this is to drill a hole in the panel, fit a screw and then pull out the dent with a slide hammer.
Not having a slide hammer or the inclination to buy one I chose a different method, which involves welding a nail to the dented area and then pulling it out with a pair of mole grips. Unfortunately or fortunately, depending on which way you look at it, the panel would not budge by pulling on the mole grips, so something a bit heavier was needed. This came in the form of a ratchet strap anchored to a nearby milling machine, that got some of the dent out.
Another nail was welded on about a foot lower and more of the dent was pulled out without assistance of the ratchet strap.


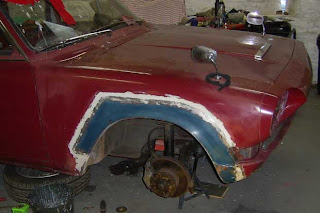
Further forward on the passenger wing, part of the wheel arch had rotted away quite severely, so once again the rot was cut out and a new piece from the spares front end was let in. A layer of filler has gone in to cover the join and has also had a coat of undercoat to slow down the rust, just need to wait for some better weather to spray over it.

Having done repairs to both front wings, it seems that a previous owner has already repaired both wings, but the rust has come through again, which really strengthens my resolve to make sure that the car is throughly waxoiled as soon as possible.

Friday, October 12, 2007

A few more miles & those annoying little jobs.

Been out again doing some reasonable miles in the 2000, taking a trip over to Cambridge to see my folks and catch-up with friends at The Cambridge Museum of Technology. It really is a pleasure to be out driving in the old 2000, with it's better road presence and more comfortable interior, quite a shock to the system after a Spitfire.
On my way to Cambridge I stopped in at Northampton to meet up with Tim Bancroft to pick-up a tow bar for the MkI, it will not go on straight away but is part of my future plans for the car.

I now have the reconditioned propshaft fitted, getting rid of that annoying vibration when accelerating up to 60mph, but my current headache is the clutch master cylinder, it needs new seals, but due to the postal strike I do not know when I shall get the parts from TD Fitchetts.
So for now the car is laid-up in the barn having a few other jobs seen to on it.
First off, last night the indicator ring, which also holds the indicator stick, was replaced, as the old one seems to have broken many years ago and caused the indicator stick to be somewhat limp in your hand. Luckily there was a spare ring on the parts front end, which I got when I bought the car.
Next was the drivers door, I had thought for a while that the bottom hinge pin was just worn, but as I removed the door it became all to evident that the pin had actually sheared off. So some time today has been spent first of all trying to punch out the old pin and then drill it out, made more difficult with less than brilliant access for straight drilling through the pin on the car and a case hardened hinge pin.

Tuesday, October 02, 2007

Another run out with the 2000 & Spitfire be gone.

Over the weekend the 2000 has been out for a bit more of a shake-down, covering an easy 300 miles. After driving the Spitfire for so many miles around the country and on the motorways it has been a great pleasure to drive a Triumph with reduced road noise and better road presence. Unfortunately the reconditioned propshaft has not arrived yet, but the old one did not seem to give any more problems.
Although I already knew about it, I need to make some serious investigations as to the cause of a whistling wind noise from the passenger side door. Above about 55mph the noise gets quite noticeable and once up to motorway driving speeds it can get somewhat loud and annoying. One way to reduce the problem is to open the window slightly, but then with the weather we have been getting recently it is not so preferable.
Another part which needs attention sooner than later is the fuel filler cap, as I have been filling the car up with more petrol for these longer journeys and have also been pushing the car a bit harder round corners it soon became evident that when cornering hard right, petrol has been sloshing out through the filler cap, not good.

While on my journey out to Leicester I popped in to see GT6Jim to have a chat, a nose around his MkI GT6 and give him a quick ride out in my 2000. Afterwards I drove up into Birmingham to pick-up my latest eBay purchase, another Triumph 6 cylinder head. Not absolutely sure what I shall do with it just yet, though it might be used on the 2000 as part of an engine upgrade in the future.

Yesterday (Monday) the Spitfire was driven back by it's new owner all the way back to the Lake District. I have not heard any complaints yet so I can only hope that he has got back safely.
It's a shame to see it go, but it was getting to a point where I was not enjoying driving it as much as I used to and it was also going to need some attention to the bodywork, a job I felt I did not want to get into.
Still hoping to have the GT6 on the road before the end of the year, so the small chassis Triumph fun can start again.

Sunday, September 23, 2007

MOT success & Spitfire for sale

Yesterday (Saturday) the Triumph 2000 went through it's MOT without any advisories and by the time I had returned from the test station, the package from the Triumph parts supplier had turned up. Being half day opening at the Post Office, a quick trip into the local town was made to pick-up the required tax disc, free of course. Back at the farm again I made a start on checking my new parts and fitting them, starting with the speedo drive gear, which meant draining the gearbox oil again.


Since getting the MOT I have covered a few miles, partially to get myself used to the car, but also to workout what needs to be done. Luckily over the 130 or so miles I have covered so far nothing too major has come up. Though one of the things I do want to get sorted fairly soon is the propshaft, the sliding joint in it is getting worn and causing vibrations in the car between 55 and 65 mph, which at the moment just means I need to go faster or slower than that.

During my drive around on Saturday afternoon we popped over to New Tredegar to see a guy I know, who has just got his Fowler A7 ploughing engine back on the road. We met up with him, as you can often find them, outside a pub about five miles from their yard. Although not a great distance to travel by modern standards, it was still quite momentous to get out this far, as the engine is still running in as they work through any problems as they occur.

With the 2000 on the road and appearing to go quite well I am starting to make positive moves to selling the Spitfire, so if you or anybody you know is looking for a tax exempt Triumph Spitfire 1500, why not have a look at the Club Triumph Classified section?

Thursday, September 20, 2007

Progress, of a sort...

After a couple of evenings trying to blend in the new piece of wing arch on the Shed, I have decided to take a break from that as every time I put on some filler to get rid of one ridge, another came up. I really want to take a break from bodywork for a while and come back to it afreash with ideas on how to banish my ridged filler work, so for now it has received a couple of coat of primer to prevent any water or dirt getting in.
The drivers side headlight bowls have been re-fitted albeit bolted instead of riveted, as to rivet them in you need to remove a special circlip type ring to get enough space, which was most likely to break as you try to remove it. Also the remaining front lights and bumpers have been fitted.

A date has been booked for the MOT, this coming Saturday, so some time has been spent chasing parts suppliers to find out where the parts I had ordered are, only to find that they have not sent them yet. It is a real pain that I have not had the parts yet, despite asking for them to be sent out on Tuesday, two days later they have not left the supplier. With that in mind I have set about using my contingency plan to try to get the car through the forthcoming MOT.
The two things I really wanted for the MOT were the halogen headlight, as all the other lights are halogens and a new rear exhaust mounting rubber. So far I have been lucky enough to find a spare sealed beam headlight and have glued the slightly dodgy exhaust mounting rubber, lets just hope both will be sufficient to get through the MOT.

Sunday, September 16, 2007

Shed repair panels

The promised repair panels for the Shed were delivered on Tuesday, by a 18ton curtain side lorry, made all the more interesting when the tail lift on it failed, being able to lower itself, but not back up again. With a bit of man handling it was soon off the lorry and into a trailer for the short trip, through tight lanes, down to the farm.
There is a fair bit more of it than I had initially expected, it still having the steering column, pedals, and dash fitted. Fortunately for me it appears that the car, a few years prior to being cut-up, had received new front wings, so they were still in near mint condition.

If I was a better person, I should have carefully removed the whole wing and fitted it complete on my car, I'm not that good though. So a repair section was cut from the recovered wing instead.

The hardest part of the job so far has been to re-constitute the inner wing, as this required a judicious amount of bending and forming to get the inner wing to meet up with the outer wing in something akin to the original form. After welding the inside, all the welds and joins have had a coat of my favorite seal sealer, Adheseal, then a coat of primer.
I expect now to spend some of the next few evenings applying filler to cover and blend in the wing, before spray painting it.

Sunday, September 09, 2007

The Shed, a week on...

It's been a fairly busy week on the shed, working my way through it finding what needs to be done for the MOT. When I bought the car I already knew about some of the jobs that needed to be done, including replacing the speedo as the original one had failed. Unfortunately when the speedo failed, it also stripped the threads from it's drive in the gearbox, so that will have to be replaced in the week.
Fitted new in the week was a ignition switch and luckily for me I was able to use the original ignition switch and barrel in the new switch, keeping the same key for most locks in the car. Also fitted was a reconditioned steering rack, as the old was was showing excessive ware at the tube end, I believe this had been picked up at the last MOT, but had been wrongly diagnosed as slack in both track rod ends.

Quite a bit of time was spent on the nose cone again, this time adding filler where required in a attempt to make it look right. After a few nights on it I came to the conclusion that it was never going to look perfect, so I have taken it to a point where it looks fairly presentable, with the intention to replace the whole nose at a later point.

I hate to say it but, I seem to have become a bit of a polisher, as I have been slowly making my way around the car, cutting the very faded paint back, polishing and then waxing it. Hopefully once the paintwork is up again it should not need that much work.

Sunday, September 02, 2007

The Shed gets a nose job

As mentioned previously, repairs to the bodywork of The Shed had been started after it hit a Deer almost a year ago. The first job of the day was to re-connect completely the electrics which ran from one side of the car to the other behind the nose piece, having been partially cut when the old material was removed.

With the electrics re-connected and tied up out of the way, work started started with cleaning the area round the hole ready for welding and then welding in a couple of pieces of steel close to the headlights to give the shape of the nose, against which the main part could be formed. A piece of sheet steel was then held at the bottom, using three pair of mole grips, and carefully bent round to the shape of the remaining part of the nose and the new piece by the headlights. The steel was just tacked in place at first to allow me to get the shape of the nose and determine how much needed to be cut off. Once roughly trimmed down the weak welds were broken, followed by final trimming of the nose, then the piece was fully welded back in place.
It will need some filler put in to hide some of the welds and remove other imperfections, but for now it should do the job. Not too bad for an afternoons work, the leading edge of the nose is not as sharp as it should be, but it should do for now.

Next major job will be to re-constitute the drivers side wing, a few choices here. Either I replace the whole wing, get a arch repair panel or try to patch it together with numerous pieces of steel. At the moment my preferred plan is to get a repair panel, as it would be a lot easier to fit than a whole wing and would look better than anything I could make with bits of steel.

Friday, August 31, 2007

Spitfire MOT and The Shed

Been quite a successful day today as the Spitfire managed to sail it's way through another MOT, this time without any advisory notices. While this evening my next Triumph was delivered, in the form of a MkI 2000 saloon.

Affectionately know as "The Shed" the completed the Round Britain Reliability Run (RBRR) in 2006 and the 10 countries run in 2005. Unfortunately during the last RBRR the car had a run-in with a Deer, making a bit of a mess of the front end. The previous owner, Andy, had started work on the bodywork, but had not had time to complete replacement of panels.
The car comes with a spare complete front end, so the plan is to exchange panels as required to getting the car looking right again.
My plan for the next few days is to spend a bit of time going through the car deciding on what I will have to do to get it through a MOT, it may end up with me bodging panels for the short-term so I can get it on the road and replace panels as time allows me, allowing me to sell the Spitfire. Should be a couple of weeks?

For more history of The Shed why not have a look round Andy's website

Wednesday, August 29, 2007

Spitfire MOT prep.

With the MOT due on my Spitfire in just over a weeks time and the Bank Holiday upon us, I decided it was time to start getting the car ready.
Fortunately as I have been using the car quite regularly, the car is in quite good condition as any problems noted were normally sorted relatively quickly.
Work that I have had to do included fitting a new exhaust back-box, bought from Paddocks a few weeks ago, checking the screen wash and fitting new wiper blades – apart from that the car was pretty much ready for the MOT.

Since I plan to sell the Spitfire a few weeks after the MOT, once I have another car on the road, a fair bit of time was spent over the weekend on the rear bodywork. Fibreglass was removed from the inner rear wheel arch and wing bottom of the Spitfire to be replaced with some fresh steel, while making a repair to the boot floor and rear valance. A previous owner had repaired both inner rear wheel arches and lower rear wing sections with a mix of fibreglass and aluminium matting at some point, but the rust was starting to get under some of it and lift it up.
I repaired the passenger side fibreglass sections about a year ago, so it was about time I got the drivers side done.

Wednesday, August 22, 2007

Spitfire - an update

A few weeks ago I got my NOS propshaft from Paddocks, only problem was that on standing it next to the one I had just removed from my car I noticed the new one was 1/4" longer when both were fully compressed. Undeterred by this I was just able to squeeze it in place, but was unhappy with it being so tight in-between the gearbox and differential, so a quick call to Paddocks to explain the situation was made and assurances given to me that there should be no problem with it.
So with the gearbox tunnel back in place, I took the car out for a run, a pleasure to drive now the vibrations had gone, well for at least two miles, when a new vibration and noise started. I quick inspection of the propshaft showed that the sliding CV joint was running very hot, so it was time to turn around and head back for home to remove this new propshaft.
After further discussions with Paddocks it was decided that I would return the NOS propshaft and replace it with a slightly more expensive, but more extendable, propshaft. A day or so later it had arrived, been fitted and run in with no further problems.

With the car running quieter and vibrations reduced I was able again to get up to good speed and really get the engine warmed up. Only trouble was that the car was overheating and pushing all of the coolant out of the engine through the radiator expansion pot. This went on for a few days with me continually having to refill the system, despite having flushed the cooling system through numerous times.
I finally worked out what the problem was when plumes of white smoke issued from the exhaust after a spirited run - the head gasket had failed. Just what I did not want as I was due to drive down to Cornwall in 36 hours time. So that evening the head was stripped down to reveal the fire ring on number 4 cylinder had failed, letting a weep through. Fortunately my local motor factors was able to get me a brand new head gasket on same day delivery, so I managed to get a lift to his shop, pick up all the required parts and set to getting it all back together again.
24 hours after the head gasket had gone the car was up and running again, would have been quicker if I had kept a spare gasket in stock. Since then the car has done me trouble free mileage to and from Cornwall and then down to Exeter and back, totalling 600 mile in the past fours days. I reckon the car is going the best it has since I brought it, shame I am thinking about selling it now.
Know anybody who was to but a tax exempt Triumph Spitfire 1500?? contact SpitBang through the Club Triumph forum or leave me a comment (will not be published)

Saturday, July 28, 2007

The current state of play

I have a had a few developments with my GT6 since it went up to Birmingham, the guy who is modifying the exhaust manifold now understands how much of a headache it is to get the exhaust manifold past the back of the engine. This is due to me moving the engine back six inches in the car and consequently not having as much space between the engine and chassis as there was with the engine in the standard position. The upshot of all of this is that instead of modifying the manifold you may have seen in previous postings, the decision has been made to start afresh, though this is going to take longer to get finished.

This delay in having the exhaust system done has a couple of knock on effects, firstly means there is no chance of the GT6 being on the road when my current daily driver, Spitfire 1500, runs out of MOT, secondly it means I would be left with little or no time to get it finished and run in before the 10CR.

For quite a while now my Spitfire has just been used, with few improvements and this fact has been catching up with me. After excessive rumbling and vibration started from under the car from about 45mph, I thought it was about time to have a look at what was going on. Last time I replaced the universal joints on the drive shafts I noticed the rear wheel bearings were starting to get loose and the bearing cups turning in their housings, so having worked out how much it would have cost me to replace the necessary parts I decided to go for a pair of fully reconditioned drive shafts from TD Fitchetts (they had them in stock)
Unfortunately after also replacing the middle section of the exhaust, the bad vibrations are still there, so a NOS propshaft from James Paddock has been ordered along with a exhaust back box.

The aim now is to get the Spitfire in a MOTable state, while doing any other prep jobs for the GT6. Then once the GT6 is on the road think about my long term intentions for the Spitfire, perhaps move it on and get a 2000 saloon or even a modern?

Sunday, July 08, 2007

Out with the GT6

Had a morning out with the GT6 on Saturday, unfortunately it was on a trailer at the time. I drove up to a workshop outside Birmingham to have the remaining sections of the exhaust system finished off. The car will be up there for a few weeks now, as while it is up there it is being used as a jig for a few other exhaust manifolds.
The journey up to Birmingham was quite uneventful, only seeing a couple of classics on the road, but no Triumphs. Thought I might see one or two going up to Stafford for the weekend, but no such luck.

While the car is away I will be spending some time finishing off some other jobs for the car, such as the fuel returns into the fuel tank. I might even find some time to do a bit of bodywork on the Spitfire in anticipation of the next MOT. The sill increasing look like they need replacing, I might just plate them as required for now and replace them once I have the GT6 on the road.


Hopefully once the exhaust system has been finished, the rest of the car will be ready to come together, then a week or two of hard work to get it ready for the MOT?

Monday, June 25, 2007

Cooling bits

Made a bit more progress on the cooling system, the idea as taken from Dave Powells Crazy Spitfire Blog, where a swirl pot is used after the coolant leaves the water pump, the excess from the top going to the radiator expansion tank along with water from the bleed off on the radiator. The coolant is then drawn back into the main system to a point just before the water pump, to get it to rejoin here has been a bit of a pain as most readily available "T" pieces only have 1" outlets, which is too big for what I want. So instead I have made my own "T" piece from two joiners by cutting a 5/8" one in half and sticking into the side of the other. It was a nice tight fit between the two and then chemically bonded together with JB weld, should be interesting to see how it holds up.

Been struggling for a while to find a fan for the 205 radiator, but struck lucky when I won a fan from a Nissan Micra and it is even a "pull" type, so it can be mounted behind the radiator, reducing the restriction to the flow of air.
I have been able to cut off the excess mounting lugs, it had three but only two roughly lined up, the third would not line up with anything I could bolt it down to. However it does all sit well on the rad, will just have to wait and see now.

Back in the car I have been laying a bit more of the sound deadening down again, trouble with that stuff is if you start putting it down in one position there is no chance of being able to lift and reposition it, guess that is probably a good thing though.

Tuesday, June 19, 2007

Bonnet struts

It's been a few weeks since my last update, so I best fill you in on what has been done recently.
The radiator I am using is from a Peugeot 205, a common upgrade for the Triumph Spitfire. While it fits nicely due to it being quite short and very wide, one problem incurred is how to fit in the bonnet support. The original support folds away forward when the bonnet is down, however with the new radiator there is not enough space for it to fold away. To get round this I am using a pair of gas struts from the boot door of a Rover 214.
I made sure that when I got the gas struts from a breakers that they came with the ball joints used to attach them to the car, these ball joints have a M8 thread on them, which I used with a locknut and washers to hold them onto the inner wheel arch of the bonnet. The other end of the strut is attached to one of the front quarter valance mounting plates, via a right angle bracket made from an old number plate bracket.
The whole bonnet is a lot easier to lift up now as, past a point, the gas struts assist the lift and once up holds the bonnet quite firmly, well worth it I reckon.

I have had to move the GT6 around the barn recently, so the steering column was fitted again and much to my annoyance, I found that the steering shaft was touching the exhaust manifold. Fortunately, this problem is easily overcome by moving the steering rack over again, this did require though a little extra clearance for the steering knuckle joint as it passes through the suspension turret.

Around the car, some of the smaller jobs have been completed, with the clutch slave cylinder serviced and connected and the brake hydraulic system also connected although neither have been filled or bled yet.

In the footwells, the sound deadening has been laid down, with the rest of the car yet to do. One thing I do not want to do is to cover the rest of the inside of the car and find there is not enough material left to cover both sides of the gearbox tunnel, that area being a major source of heat.

Tuesday, June 05, 2007

Brakes and bits

As the GT6 gets nearer to completion I keep on finding yet more little jobs to finish off, having a note book beside me most of the time helps as I can jot it down and make sure I tick it off later once done.
Over the weekend I fitted up the remaining brake hoses on the rear of the car and checked over all the hose connections, just as well as I also found some loose.
Seeing as I had the back end up in the air again to do the brakes, I found time the free up one of the adjustable rear radius arms. It obviously had not been adjusted for some time and will probably need altering once the car is on the road and I get a chance to have all of the wheels aligned.

Inside the car all of the painting I plan to do has been completed and now needs to be left to cure for a week or so.

Been going great guns with the Adheseal, putting together the quarterlight latch, which was broken when I bought the car.

Also made a start on laying down some of the sound deadening, just a few pieces in the engine bay that would be easier to put down while there was good access. The inside of the gearbox tunnel will be lined out, but I rather not do that until the rest of the tunnel has been made. The deadening material came from Canada, as despite import charges and shipping costs, it still worked out cheaper to buy direct from the supplier. It is only 1.6mm thick, but is super sticky and had a reflective layer on the outside, so it should be good at preventing some of the engine heat from getting inside the car.

Monday, May 28, 2007

Paint & fuel line fitting

A few days ago my seam sealer arrived from Innotec so all of the seams as recommenced in the Triumph workshop manual and any other places which have been welded have had a coating. With the Adheseal it is best painted within four hours of laying the stuff down, so on the same night I made a start on painting the interior panels of the GT6. A couple coats have gone down now and once it has had another coat and has cured the sound deadening will go down of top.

Meanwhile, the fuel system install has been moving on with the Pressure Release Valve (PRV) being mounted on the rear tunnel and the pipework from it to the metering unit also being almost finished. I ended up getting a copper fuel pipe from Rimmer Bros. to go from the PRV to the plastic fuel line, as I thought this would be easier to keep routed through the tunnel and away from any moving parts.

Fortunately the plastic fuel lines I have came with the remains of their chassis mounting clips, so with new inner retaining pieces they could be used again, not that drilling the holes for them were particularly easy as ideally you want to be at right angles to the piece you are drilling, but at the body tub is now securely on, access to the side of the chassis rails is somewhat limited.

I will also put some extra clips in the rear tunnel, just to make sure that the fuel lines are kept clear of any moving parts.

So far I have concentrated on the high pressure fuel system, there is another fuel pipe which runs from the front to the rear of the car, this is a lower pressure line, which carries excess fuel from the metering unit back to the fuel tank and runs parallel to the high pressure system along the chassis. As it comes to the back of the car and over the rear spring, the idea at present is to run this last section in copper, so it can be securely held to the panels and turn tighter corners than the plastic fuel line.

Thursday, May 24, 2007

Prep for paint and sealing

Some years ago, before I bought it, the GT6 has had new floor panels, sills, rear valance and various other small repair panels put in, unfortunately none of these were ever painted properly after fitting. They had however received a generous coating of over spray and the results of exterior polishing. In addition to this, a substance, possibly waxoyl, had been spilt down the drivers side bulkhead, getting into the drivers footwell via the cutouts for the clutch and brake.
Now, because I want to give all of the new panels a good coat of paint I need to remove any loose paint or dirt before painting, but because of the spill in the drivers footwell I have had to lay sheets down in the car and lower myself head first into the footwell to attack the spilt substance with wire brush, glass paper and thinners. Once cleaned, the plan is to re-seal any seams, paint the panels and once the paint has cured, lay down some sound deadening.

In the meantime, I have been busy on good'ol eBay and have been able to pick-up a window washer bottle. This one has come from a Triumph Acclaim, so at least I am trying to keep it Triumph. The bottle looks to fit quite well in the side of the passenger footwell, so before the MOT I will need to make some bracket to hold it in place. Also on the bottle is an electric pump, so as time allows, this will be used in place of the original old manual push pump.

I have put another foot on the combined fuel pump and filter holder I made up last week. As it was it was not freestanding, which meant if bolted down it would be pulling excessively on the two mounting bolts, with the extra limb it is now freestanding and should sit better.
A hole has been cut in the boot floor for the fuel hose to pass from the bottom of the fuel tank to the fuel filter in the car, quite a large hole had to be cut for this so a rubber grommet could be used to protect the edges.

Monday, May 14, 2007

Cool me pump

With an hour spare this evening I knocked up a cooling ring for the fuel pump. Apparently these old Lucas high pressure fuel pumps are prone to overheating. To overcome this the excess fuel from the pressure release valve is pushed round a coil of pipe around the motor part of the fuel pump.
You can buy these cooling coils, but seeing as I had an appropriately sized length of copper pipe I decided to make my own. It could do with an olive on each end to help locate the flexible fuel pipe and will probably be painted, perhaps matt black on the inside to absorb the heat?

The pump in the image is a spare, could be useful as a service exchange in the future though.

Sunday, May 13, 2007

Bit of progress

With the steering rack firmly in place, half an inch over, some time was spent re-equalising the wheel travel so that the wheels turn equally each way. This was done by winding the trackrod out on one side and winding the other side in a similar amount, once on the road the tracking will need to be re-done anyway, so it should not matter too much if it is a little out.

It was then time to move back over to the chassis work to get the exhaust manifold through. After a bit more cutting and fitting a reasonable gap is now to be found between the secondaries on the manifold and the chassis rail. The final welding was not the easiest as the engine was still in place and the sump made for difficult access.

It has been tipping it down for most the day, so I have had a bit more time to work on the car, seeing as its not too clever to go fetching or cutting wood on the hills in the rain. Because of this I have finally got round to mounting the fuel pump and filter. I started off having the fuel pump arranged vertically such that the pump was above the motor until it was pointed out that should the pump leak at all it could send petrol down into the motor. With this in mind the pump was inverted, which actually has made for easier connection of fuel pipes.
The pump and filter have not been fitted into the car yet as I want to wait until I have a fuel shut off valve so I can decide best where everything will fit.

Ordered last week from Canada is a roll of sound deadening and heat reflecting material in my attempt to cut down the noise and heat of the engine so close to the driver. We shall see how that works out eh?
I decided to buy from Canada as it worked out cheaper, despite carriage, to buy from there instead of the UK.

Friday, April 27, 2007

Not much...


Not that much to report on really, went to Standard Triumph at Brooklands (STAB) last Sunday with GT6boy from the Club Triumph forum. Interesting to see other Triumphs and to have a mooch around the Brooklands museum, apparently the event is moving next year.

The alloy steering rack mounts have arrived and have been fitted. I spent a bit of time getting the steering rack to sit central, as the new mounts do not centralise the rack as it pulls down. I then ignored the my attempts to centralise the rack as I found I wanted more space between the steering shaft and the exhaust manifold.
This would not usually be a problem when fitting this manifold, but as I have shifted the engine back it is a bit too close.
With the steering rack pushed over one side slightly the steering rack limits will have to be adjusted to have a equal lock each way, this will be done by adjusting the limit nuts on the rack and by positioning of the track rod ends.

Still have to do more to the fuel system, the current plan is to pull the fuel from the bottom of the standard GT6 fuel tank using a low pressure Facet pump I bought a few months back, then to the high pressure fuel pump via the big fuel filter.
See what time I can put in this weekend eh?

Monday, April 16, 2007

SU rebuild

I received the carburettor rebuild kit from Andrew Turner late last week, so some of the weekend was spent the Spitfire. The first job was to remove the carbs and put them in the ultrasonic cleaner for about 20 minutes, using the hottest temperature possible along with a sprinkling of dishwasher powder. This really cleaned them up well and made the rest of the rebuild much easier.

The rebuild kit included new bushes for the throttle spindles, though when I removed the old spindles I found that there was minimal ware in the carb body, instead all the ware was in the throttle spindles.
A few years ago I changed the jet bearing and jet on one of the carbs as it was leaking petrol, but I never got round to replacing the other, but this has also been done now, just as well as the new jet bearing kit has a finer thread, making equal mixture settings on the two carbs much easier.
Also in the kit was new fuel needle valves, which had started to fail, well they are probably 30 odd years old.


That exhaust manifold I fitted a few weeks back has been blowing ever since I fitted it, no surprise really considering the crappy exhaust clamps supplied. So last week I ordered and received some Mikalor exhaust clamps, at less than £2 each they are not much more expensive than those tube crusher "U" clamps and can give a much more universal pressure on the exhaust joint. I got mine from Power Engineering

Monday, April 09, 2007

On a go slow

With this long Easter weekend I had planned to get a few more jobs on the GT6 finished. The first thing was to finish off the chassis welding, unfortunatelly I have discovered that the steering rack is mooving from side to side, which means the steering shaft can touch the exhaust manifold, so I need to get the rack fixed before I can decide if anything else needs to be modified before welding the chassis. To make sure the rack will not move I shall get myself a set of alloy mounts.
Seeing as the rack is half way to being removed, I will change it for a Spitfire one. The GT6 rack is 3 1/2 turns whereas the Spitfire rack is 2 1/2 turns.

A few weeks ago I fitted a fuel pressure regulator on the Spitfire, only over the weekend was I able to look at it again with a view to dropping the pressure to the carburettors, the problem only being visable with the engine at speed, when the fuel pressure overcomes the valves in the float chambers.
Whilst adjusting the regulator I noticed fuel pouring out of the rear float chamber, before this time it had only leaked slightly from the front float chamber. I have decided enough is enough and it is time to fully refurbish the SU carburettors, seeing as the throttle spindles and bushes are worn also. With this in mind I will make a few phone calls in the week to see what I can get.

Tuesday, April 03, 2007

And its in...

After spending quite a bit of time pondering it, I have managed to fit in the proposed new exhast manifold for the GT6. It has required a slight bit of modification to the chassis rail as the exhaust passes by, but it will be no worse than what was done as standard on the 1500 Spitfires.
Once I get another grinding disc I will be able to make a start on cleaning up and re-welding the chassis, should be able to make it look as if it was meant to be like that.

Had a visit from Bruce Sellers (GT6boy) on Saturday to have a look at the exhaust manifolds and in return I had a drive out in his MkII GT6 convertible. A lot of fun that was, lovely exhaust note, can't wait to get mine done now. It was a great drive out on some local roads, until we hit the shopping traffic, makes me wish I was on a bike again, the the heavens opened up, bringing a mixture of hail and rain, not a good combination with a convertible when the hood is in the boot.

Have also managed to finish welding and painting the seat and seatbelt mounting plates, so I should be able to concentrate more on tidying up the chassis before moving back onto the fuel system again, unless I find another half finished job.