After driving the Spitfire for a while I noticed the head gasket starting to weep oil, so I re-torqued the head, ony to strip the thread on one of the nuts. Not knowing what state the rest of them might be in I decided to change the head gasket and nuts. I had already picked-up a new-old-stock Payen gasket, you can't trust some of the junk that gets sold but Payen have been well reccommended. The head was reluctant to come off, but with the coil disconnected and a quck flick on the starter the head was free.
It prooved a straight forward job, running the engine for one minute without water then re-torquing the head again. Once the engine had cooled fresh coolant was added and the tappets adjusted. Then for a longer run, once again, just as had after taking the carbs off previously, it proceeded to squirt petrol everywhere from the petrol connections onto the float chambers. Luckily with new petrol pipe and cleaned connections the problem was solved.
But then onto the job which took most of my time this weekend, wiring. On a drive out to the shops on Friday the windscreen wipers, heater motor and tachometer all stopped working, fortunately it was not far to the shop and by the time I got out it had stopped raining.
Thinking it might be a dirty fuse problem, I cleaned the fuses and contacts, but that only appeared to have caused the rear lights, indicators, dash lights and gauges to also stop working. The car still ran though and the hazard lights work all around the car and the front lights worked. It took me a while to work out that the cause of the problem was a lack of pressure between the fuses and their terminals.
All those hours when I should have been working on the GT6, not chasing dodgy connections grrr..
Oh well will try to get something done during the week. ;)
Sunday, September 24, 2006
Thursday, September 21, 2006
My GT6, the story so far.. (part 3)
The modifications to the chassis for the engine repositioning took quite a bit of time, with careful positioning of the engine and gearbox onto the chassis to enable me to work out where I would need to cut and re-weld the chassis. The engine and gearbox must have been placed on the chassis about ten times, just to make sure I had cut and welded in the correct positions, a job made quite easy with my tractor, it having a fore end loader. After a weekend of cutting and welding, the chassis was thoroughly cleaned and painted with chip-resistant chassis paint, much better than hammerite paint, which will chip easily and let the rust start.
After finding the poor repairs on the chassis I decided to take a closer inspection of the body and the repairs that had been done. Despite having had a full respray, the welding along the outer sill to the floor pan had only been tacked every inch instead of a seam weld. To solve this I had to clean out as much paint as possible from along the join and seam weld it, whilst not over heating it, to prevent other paint from lifting. That was a really nasty job as I could not remove all the paint from the joint, so all too often I would get splattered with hot paint and the mig welder was constantly getting blocked.
The welding was not much better further round the floor pan, because it was close to the chassis, who ever tried to do the floor pans once again had not seam welded it, instead had chosen to smear some silicone around it to make it look complete, oh well, out with the welder again and dodging the hot flying silicone.

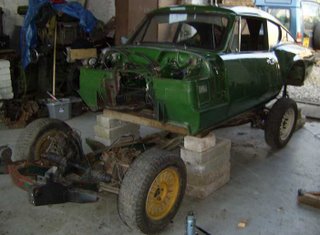
With complete welds, fresh paint on the underside of the body tub and a set of polybushes fitted to the chassis, it was time to fit the body back onto the chassis. The body is held in place by twelve bolts, some of which have aluminium spacers or rubber washers between the body and chassis, which you have to get and keep in place when lowering the body, best held in place with the use of a bit of blutac.
Fitting of the body was followed by the trial fit of the engine and gearbox so I could check for any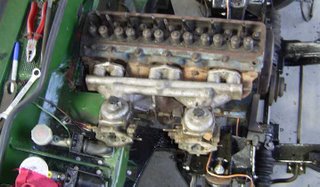 clearance issues. The first issue was quite clear to see once the inlet manifold and carburettors were fitted, the outer face of the carburettor was right up against the clutch master cylinder. Time for another re-design me thinks.
After finding the poor repairs on the chassis I decided to take a closer inspection of the body and the repairs that had been done. Despite having had a full respray, the welding along the outer sill to the floor pan had only been tacked every inch instead of a seam weld. To solve this I had to clean out as much paint as possible from along the join and seam weld it, whilst not over heating it, to prevent other paint from lifting. That was a really nasty job as I could not remove all the paint from the joint, so all too often I would get splattered with hot paint and the mig welder was constantly getting blocked.
The welding was not much better further round the floor pan, because it was close to the chassis, who ever tried to do the floor pans once again had not seam welded it, instead had chosen to smear some silicone around it to make it look complete, oh well, out with the welder again and dodging the hot flying silicone.

With complete welds, fresh paint on the underside of the body tub and a set of polybushes fitted to the chassis, it was time to fit the body back onto the chassis. The body is held in place by twelve bolts, some of which have aluminium spacers or rubber washers between the body and chassis, which you have to get and keep in place when lowering the body, best held in place with the use of a bit of blutac.
Fitting of the body was followed by the trial fit of the engine and gearbox so I could check for any
Monday, September 18, 2006
My GT6, the story so far.. (part 2)
Seeing as I was going to change the gearbox to the overdrive version and that the engine was an unknown quantity to me, I decided to remove the engine and gearbox as one unit, quite an easy job after taking off the bonnet.
Once out and with the head removed from the engine, I could see that the engine was going to need a re-bore, meaning new pistons and rings would also be required. Along with these parts and machining, it was always my intention to have the cylinder head converted for running on unleaded petrol, with this in mind, I chose to put this engine to one side for now and instead use the re-conditioned engine that came as a spare with the car.
Now despite being re-conditioned, the engine still needed going through, having spent a few years under the previous owners bench with the head removed. It was just as well I did this as I found the big-end rods and end-caps had been mixed-up, not good as they are machined pairs and should be kept together.
Around this time I had been following some of the message threads on the Club Triumph Forum, in which other GT6 owners were discussing how they had improved their cars. One of the disadvantages of the GT6 over the Spitfire is its poor cornering ability, due to one third of the engine being mounted in front of front wheels, to overcome this problem, the whole engine and gearbox assembly can be moved back by about 6 inches. To do this you need to fit a Spitfire front engine plate, modify the chassis around the bell housing and rear of the gearbox, modify the bulkhead, used a shortened prop shaft and cut-down the gear change mechanism, none of these jobs were particularly expensive, just time consuming.
 Having decided to move the engine back. I chose to lift the body from its chassis, as it would give me the opportunity to thoroughly clean, check, service and paint the chassis. With the chassis out it was easy to see that little or no work had been carried out on it, despite the body having had new panels and a re-spray. One of my major concerns about the chassis came soon after lifting the body, I found that one part had been covered by braised on plates, these were soon removed to reveal a very patchy looking chassis member. I chose to cut out this rotten piece and replace the section; it should be a lot stronger now and less prone to anymore rust coming from beneath it.
Friday, September 15, 2006
CV's are go.
The CV conversion is nearing completion after I picked-up the adaptor plates from Davesideways last Sunday. This drive shaft set-up should solve the weak points of the original set-up. As I brought the car, it had the rotoflex drive shaft fitted, as were all MkII and MkIII GT6's until 1973.
The idea behind these rotoflex couplings was to eliminate the tuck-under problem that occurred on the rear wheel on hard cornering, by giving more flexibility of the drive shaft, so the wheel would stay on the road. The problem with these rotoflex couplings is the amount of backlash that occurs when taking power on or off the rear wheels; this can be an issue when cornering.
Another problem with these couplings is the quality of the modern alternatives, I fitted a set on my car soon after getting it, a month after fitting they had already started to crack :(
The inner CV joints are from a Volvo 340 and took quite a bit of finding. You can buy them new for about £45 each or, as I did, get a pair from a car breakers, I found mine by searching on eBay for people breaking or selling parts from Volvos and then asking them whether they had the CV joints. In the end I brought a drive shaft complete with a pair of CV joints from North West Volvo Parts (01942 322880) The new drive shafts are from a Rover Metro/100, where you use two near-side shafts (the shorter ones) to go from the inner Volvo CV joints, these came from Atlas Salvage (01744 612712)
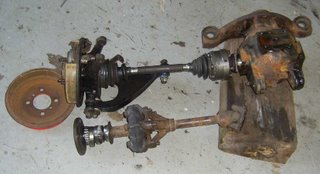
The whole assembly was a lot easier to fit together than the old rotoflex system, as you do not have those rubber donuts to deform to make it fit. If it was not for the fact that I had not fitted the drive shaft fully home into the outer CV joint, I should have been able to fit both sides on the car in one evening. Just got to remember to check the clearance between the inner CV boot and the chassis, can not be sure of it until the car has settled on its springs, I may need to fit a smaller CV boot.
Sunday, September 10, 2006
A weekend off.
Armed with a fresh MOT I decided to have a weekend off from working on cars, so I took myself down to the country show at Barlylands Farm near Billericay in Essex. I left Wales at about 3am, so to give myself a chance of a clear run across the county, down the M4 and half way around the M25. It took just under 3 hours, only slowing for roadworks. In Billericay I met up with a few friend and travelled the last few miles in a Sentinel S4 steam wagon. Didn't do much for the rest of the day, was starting to feel a little tired by 3pm. Went out again in the evening on the steam wagon to find some fish and chips and then bach to the show again to find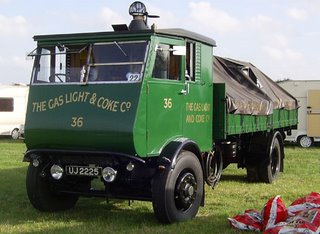 the beer tent.
On Sunday I took a leisurely trip back to Wales, taking a longer trip, stopping in Cambridge for a breakfast and then via Northampton and Gloucester to avoid the toll bridge. The advantage of going this way round was that I was able to pick-up the spacers I need to finish off the CV conversion, just need to get the right bolts then I should be able to fit it all together. See the link for The Crazy Spitfire blog on the right hand side to find out more.
 the beer tent.
On Sunday I took a leisurely trip back to Wales, taking a longer trip, stopping in Cambridge for a breakfast and then via Northampton and Gloucester to avoid the toll bridge. The advantage of going this way round was that I was able to pick-up the spacers I need to finish off the CV conversion, just need to get the right bolts then I should be able to fit it all together. See the link for The Crazy Spitfire blog on the right hand side to find out more.
Thursday, September 07, 2006
MOT time.
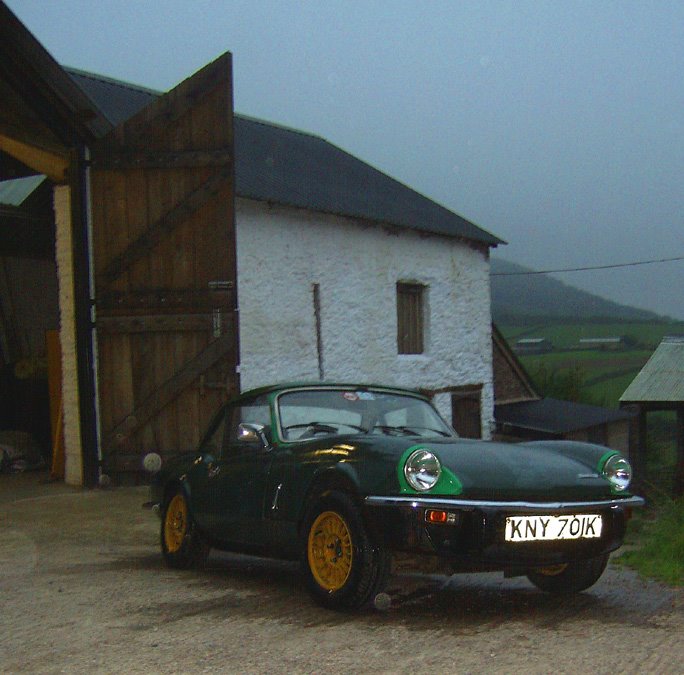
Work on the GT6 has not progressed much in the past month due to work on my other car, a 1972 Triumph Spitfire 1500. The Spitfire uses some parts from a 1976 Spitfire I had on the road previously.
It was a case of second time lucky with the MOT, it failing on two points, low handbrake efficiency and corrosion on the chassis.
The chassis corrosion was on the out-rigger, where it attaches onto the main chassis rail, this was quite easily remedied by cutting out the corrosion and welding on a plate between the out-rigger and the main chassis rail, that welder I brought a few months ago is really showing its worth now.
The handbrake efficiency is a well know problem for the Spitfires and GT6's. Made more difficult for me as I had just replaced the rear handbrake cable and it had not yet straightened out yet, so it would not release properly.
Anyway, the Spitfire now has a MOT and is legal for the road, because it was made before 1973, it should be tax exempt, unfortunately in order to change the taxation class I need to go to my local DVLA office and I can only get ther by using my Spitfire, meaning I have had to pay for road tax, should be able to get most of it back after the taxation class has been changed.
Atleast I can resume work on the GT6 again, hopefully.
Subscribe to:
Comments (Atom)
